
| Home |
| Dragonnorth... |
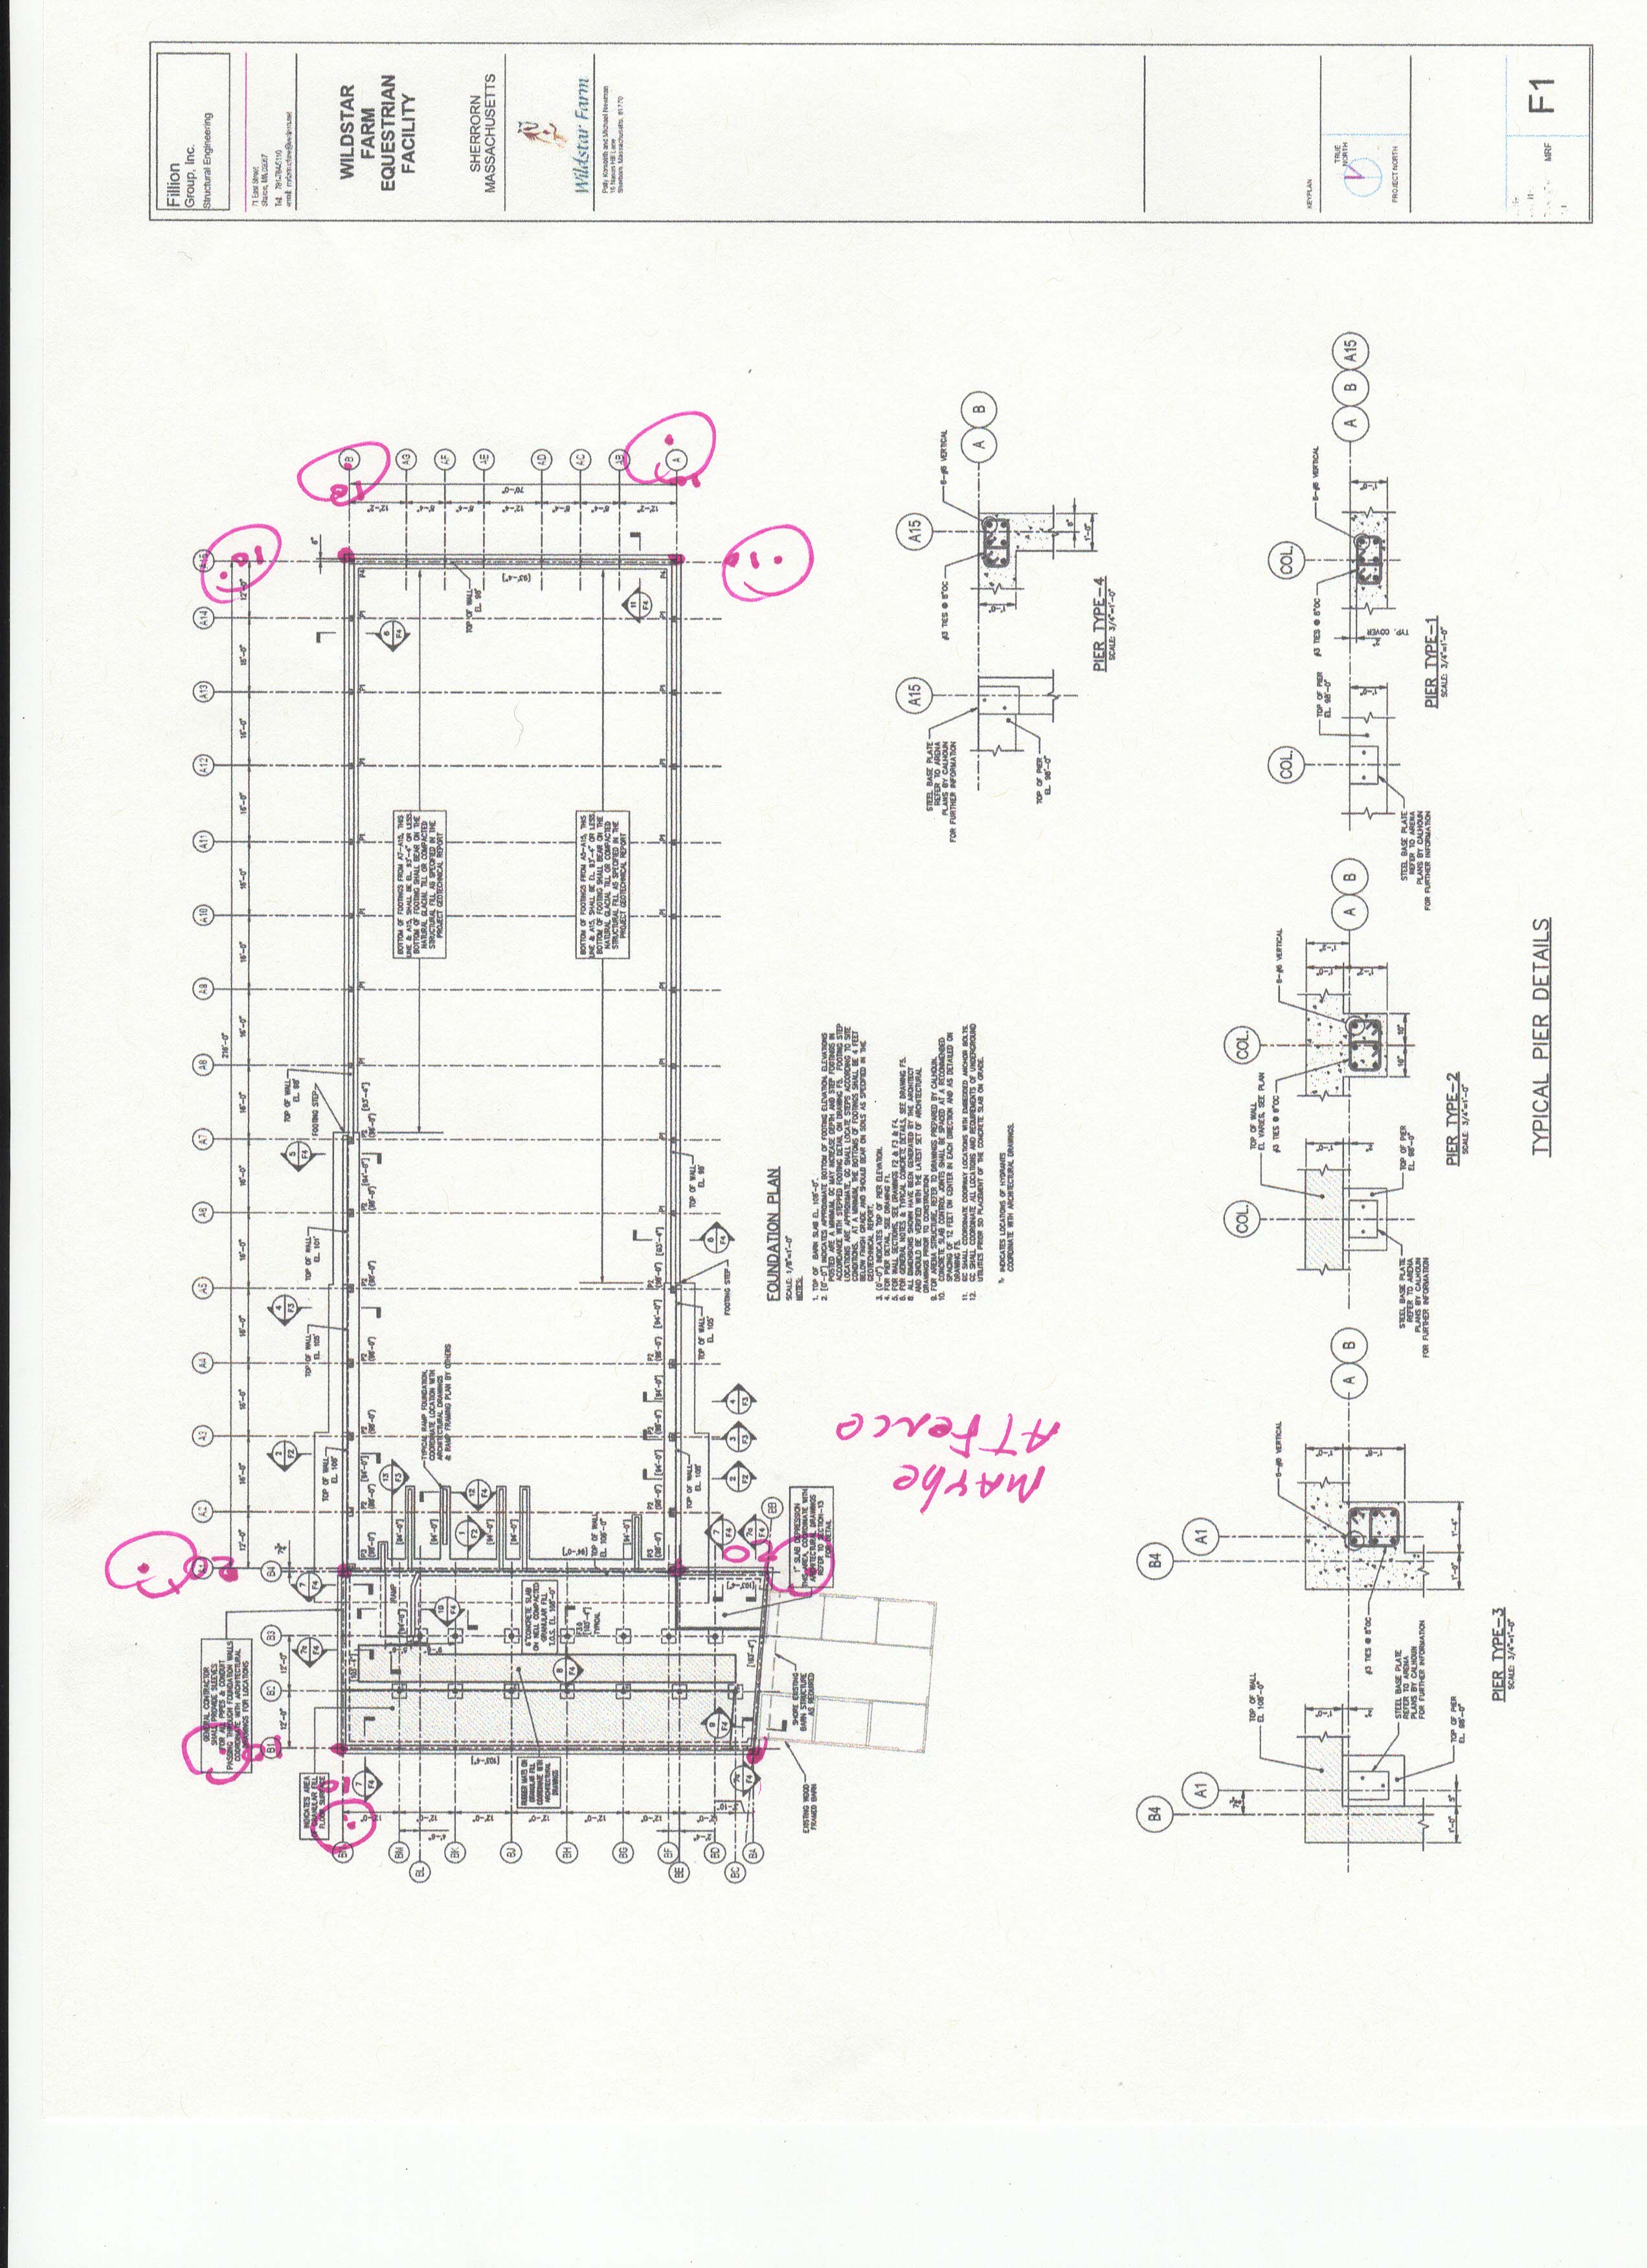
| Wildstar Farm |
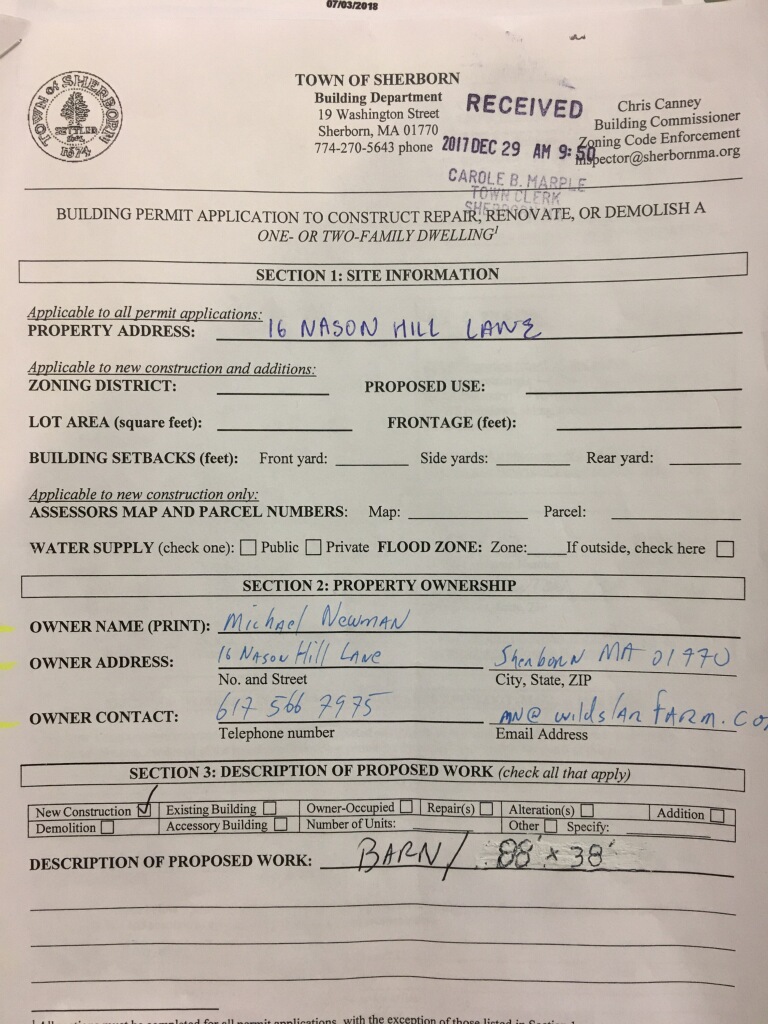
| 16 Nason Hill Lane |
| Barn Fire Panel |
| Case Law |
| Manure, Bugs and Disease |
| Rules & Officials |
| Login |
| Log In... |
Wildstar Farm Construction is Complete
Construction and site work was:
Started in early 2017 and
Post Construction Activity
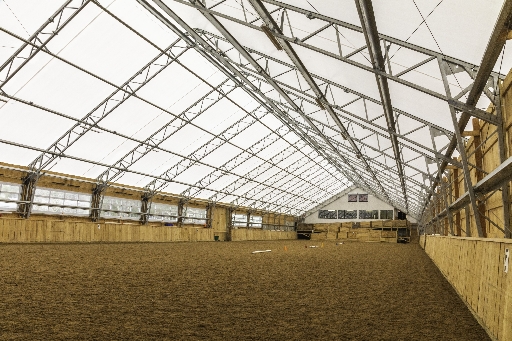
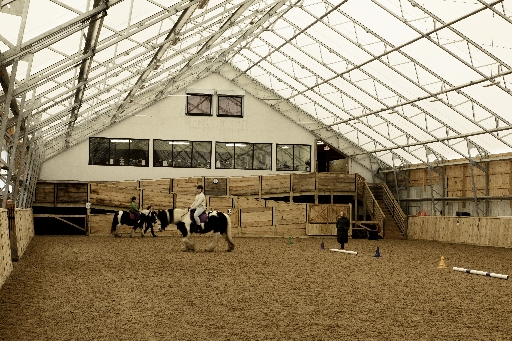
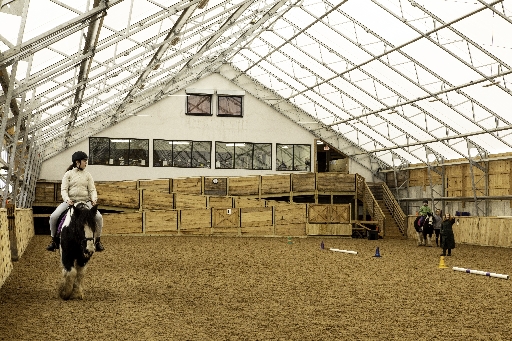
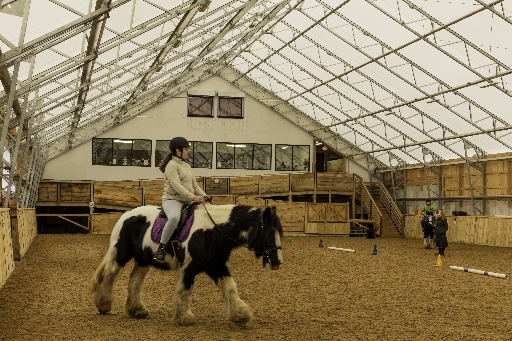
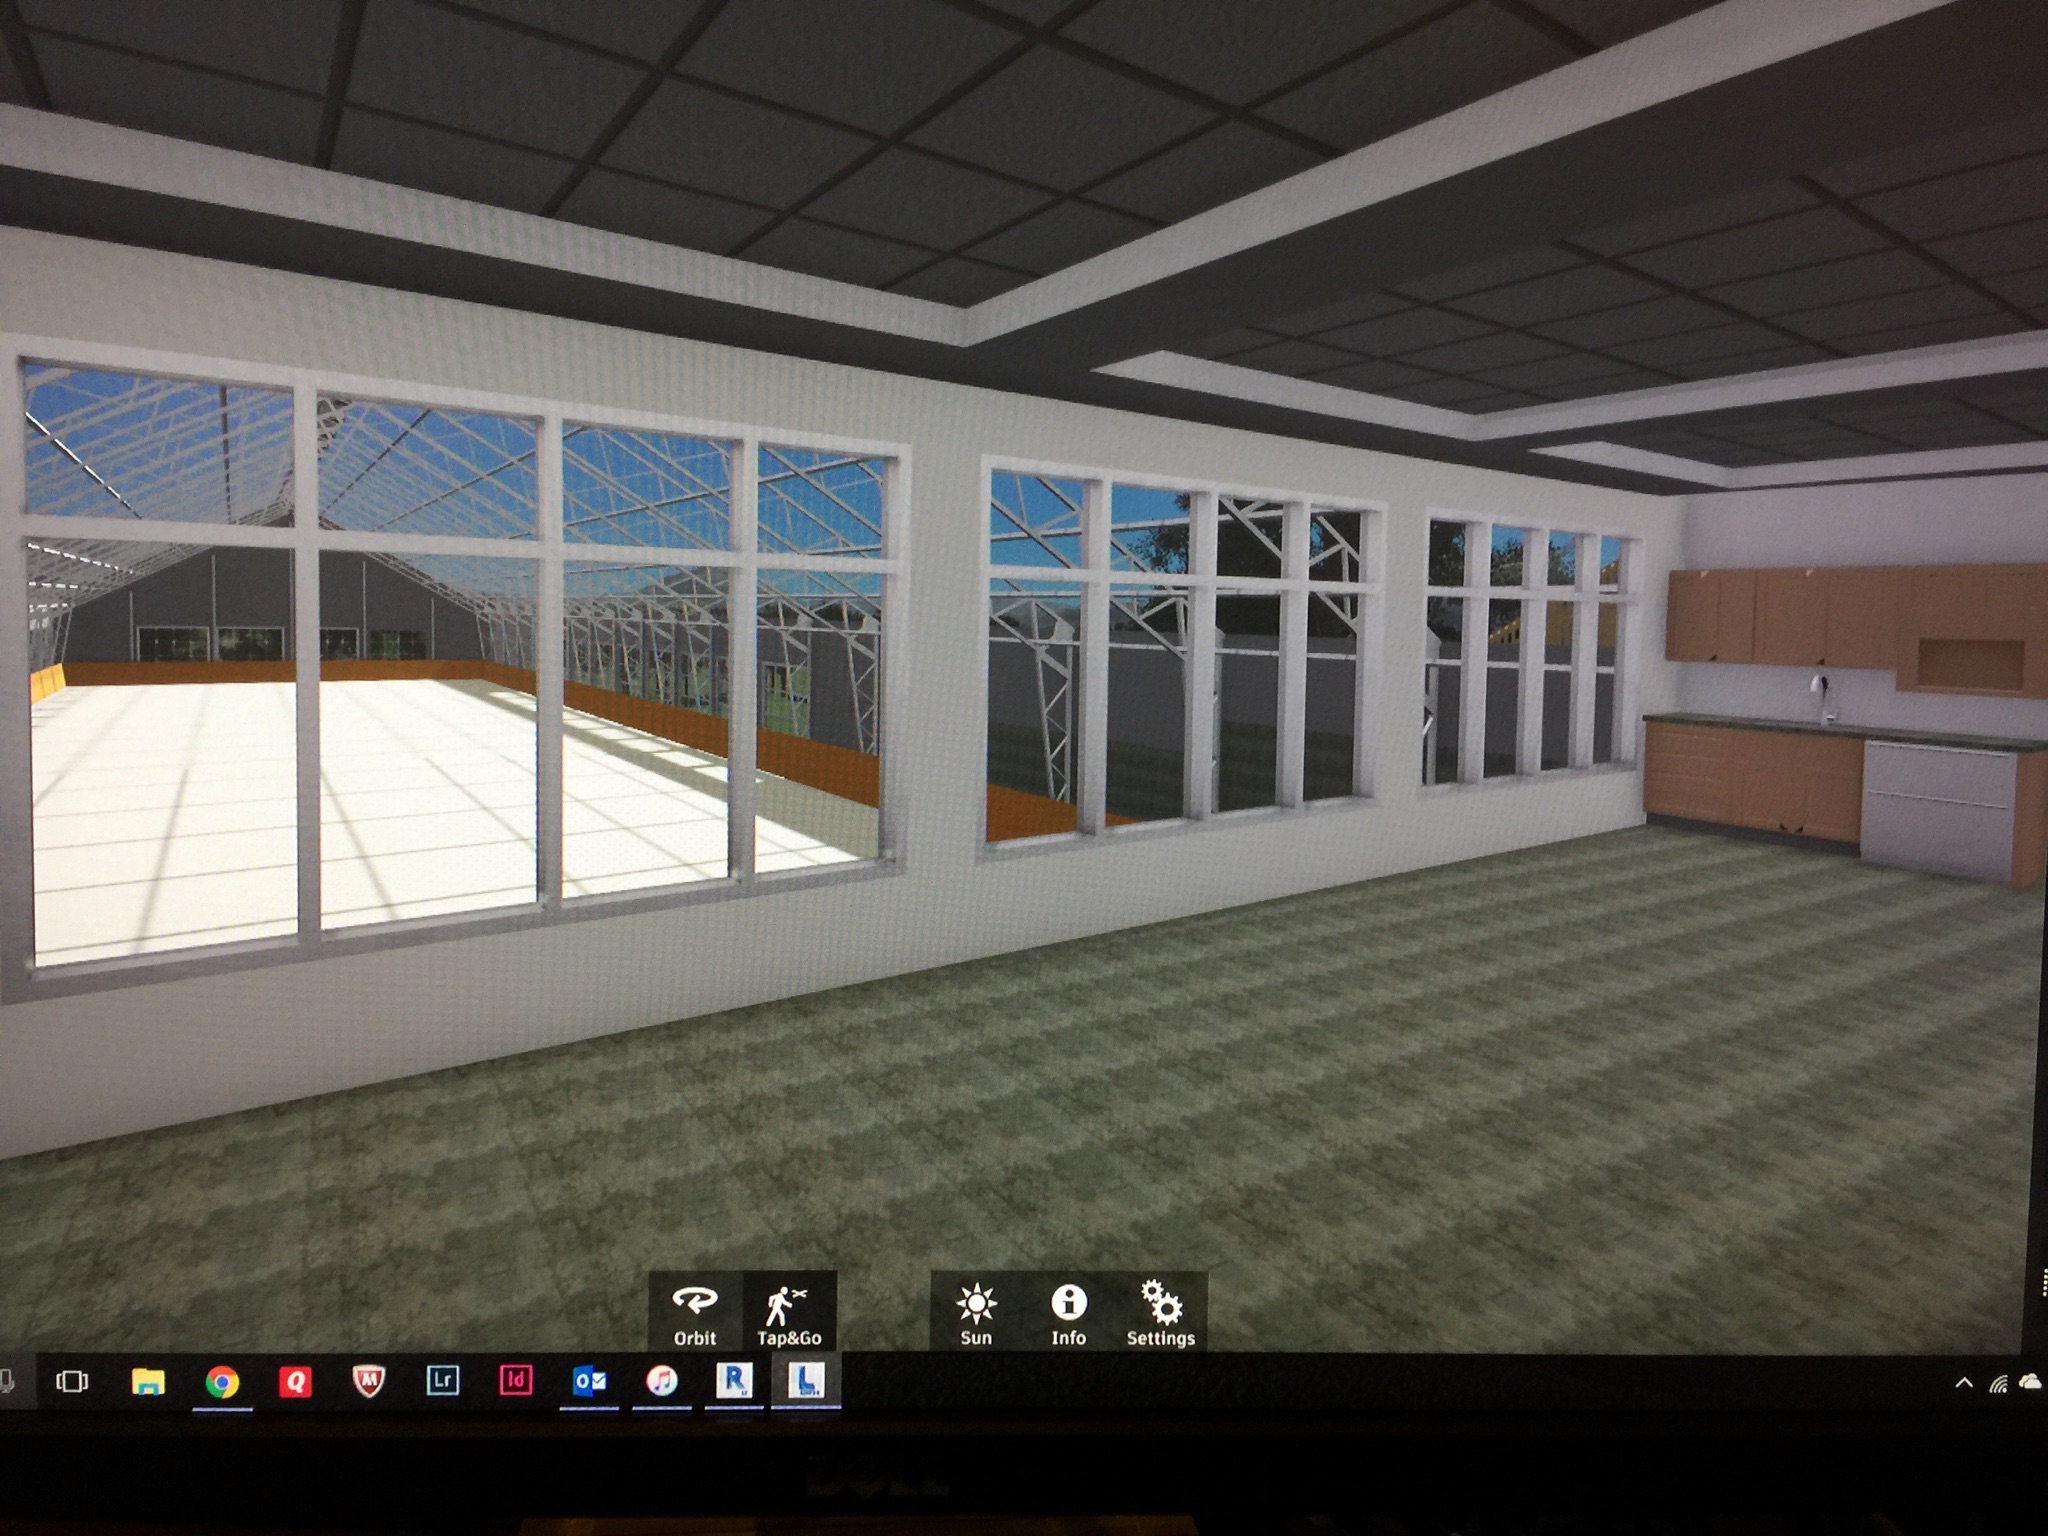
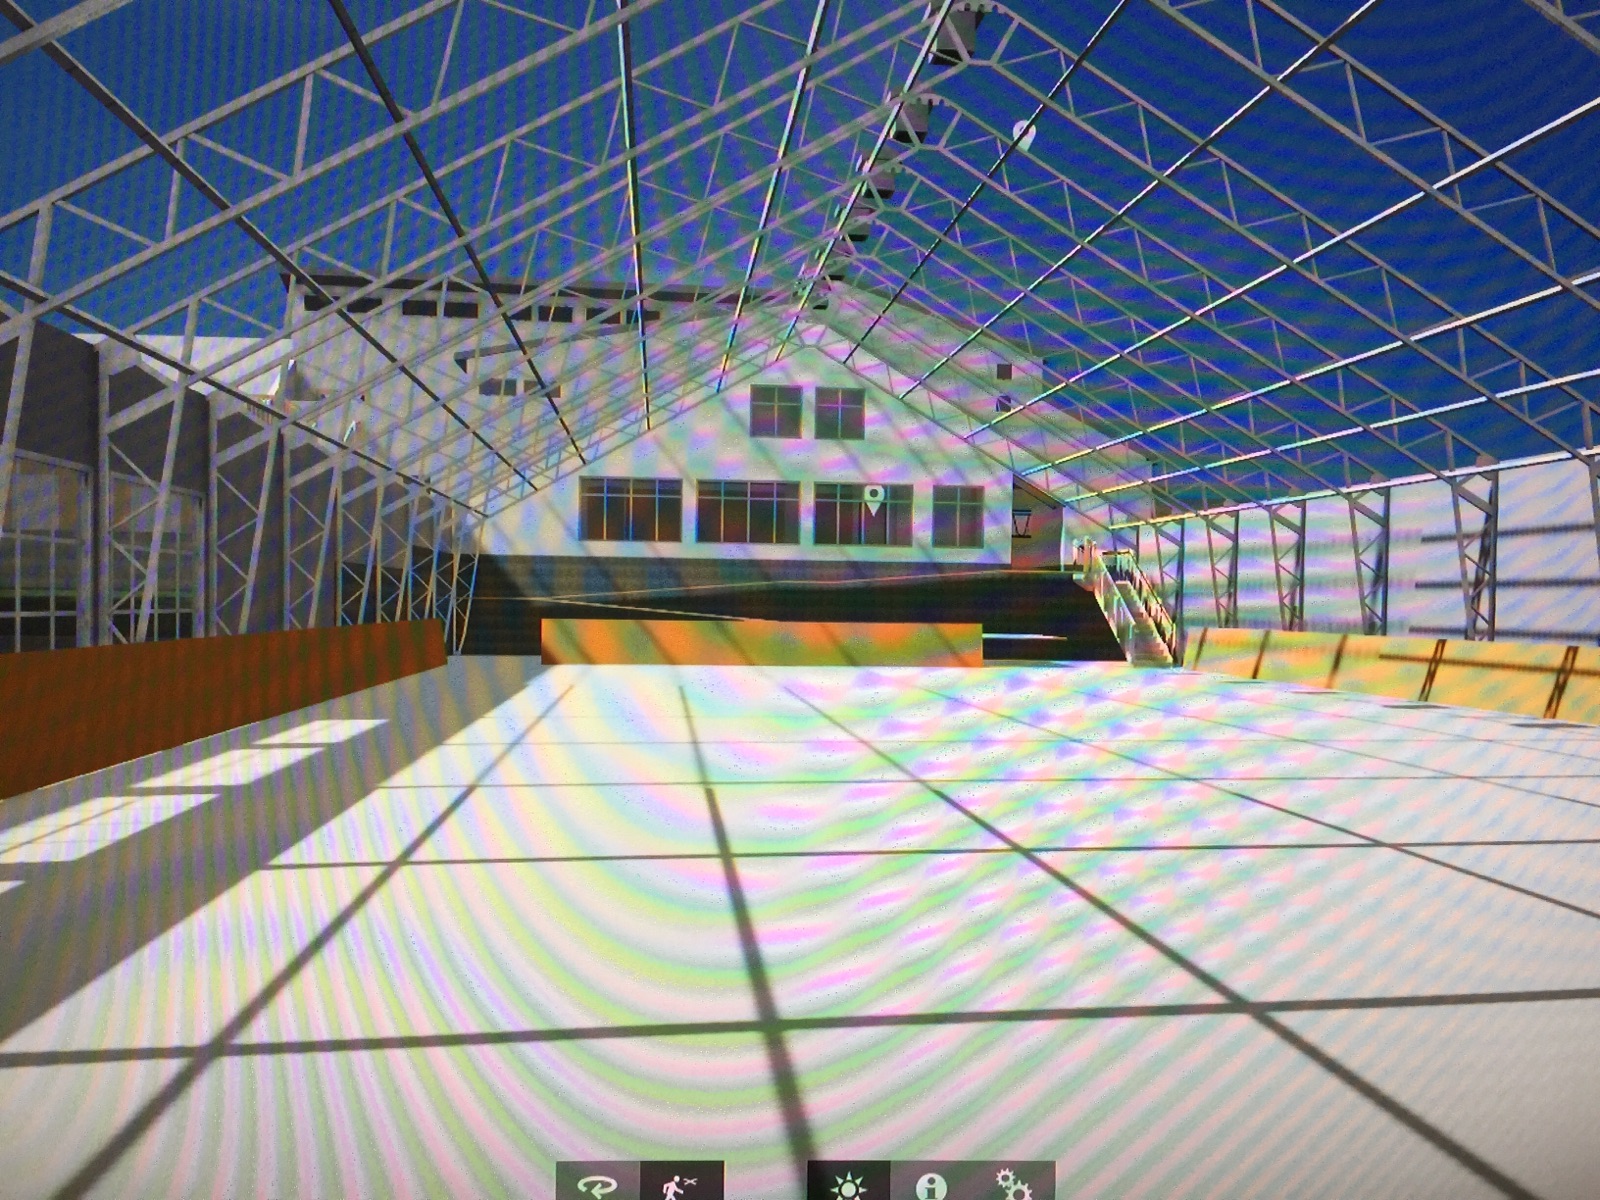
Ring Interior Photos
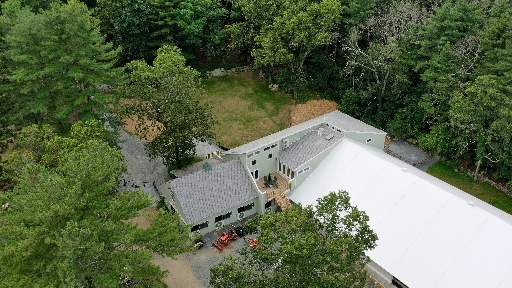
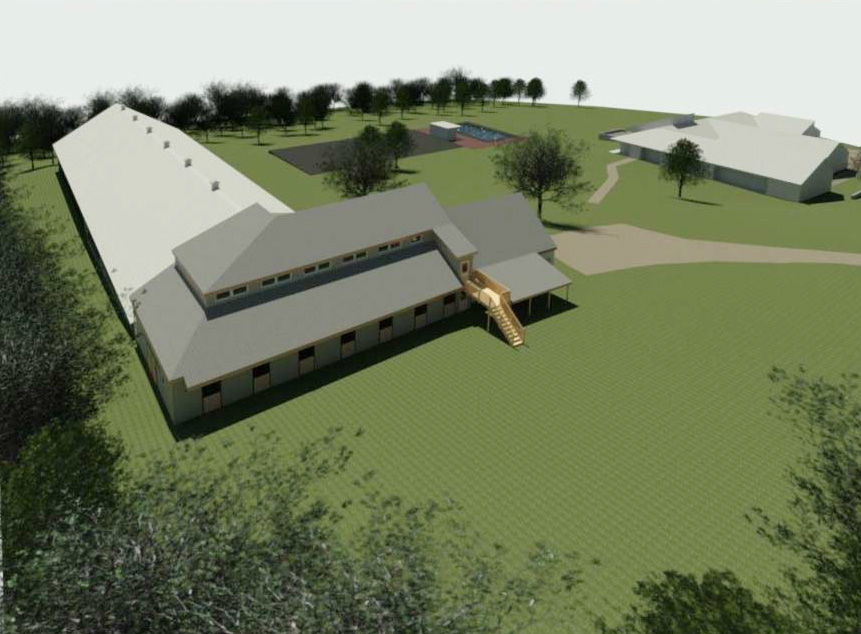
Aerial view from the west arena door
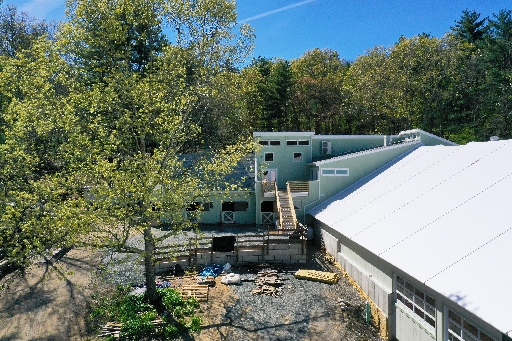
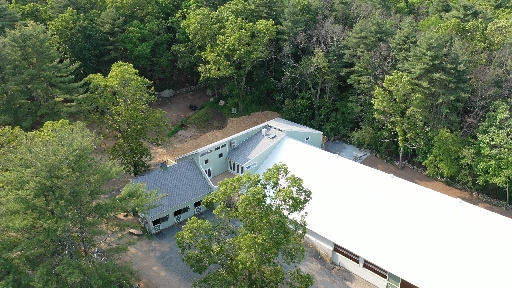
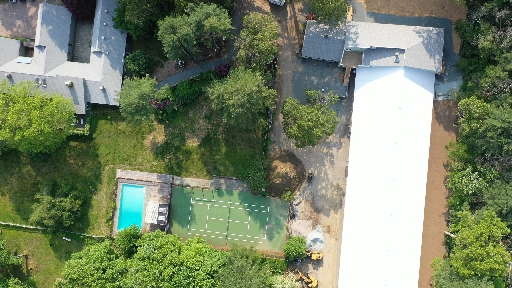
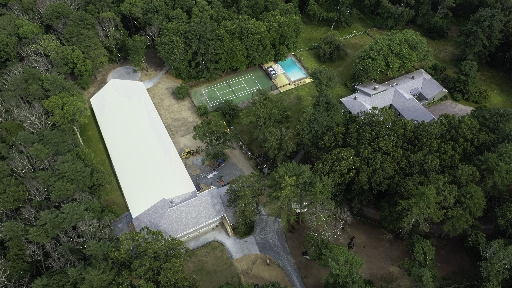
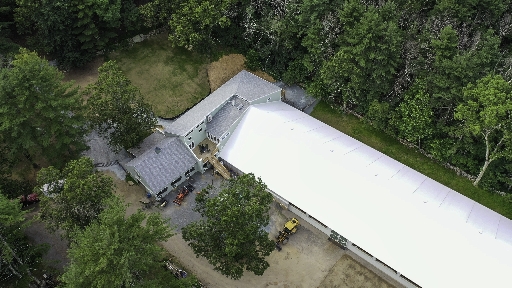
Aerial Photos
James Guarino took these photos from his drone:
Site After
Construction
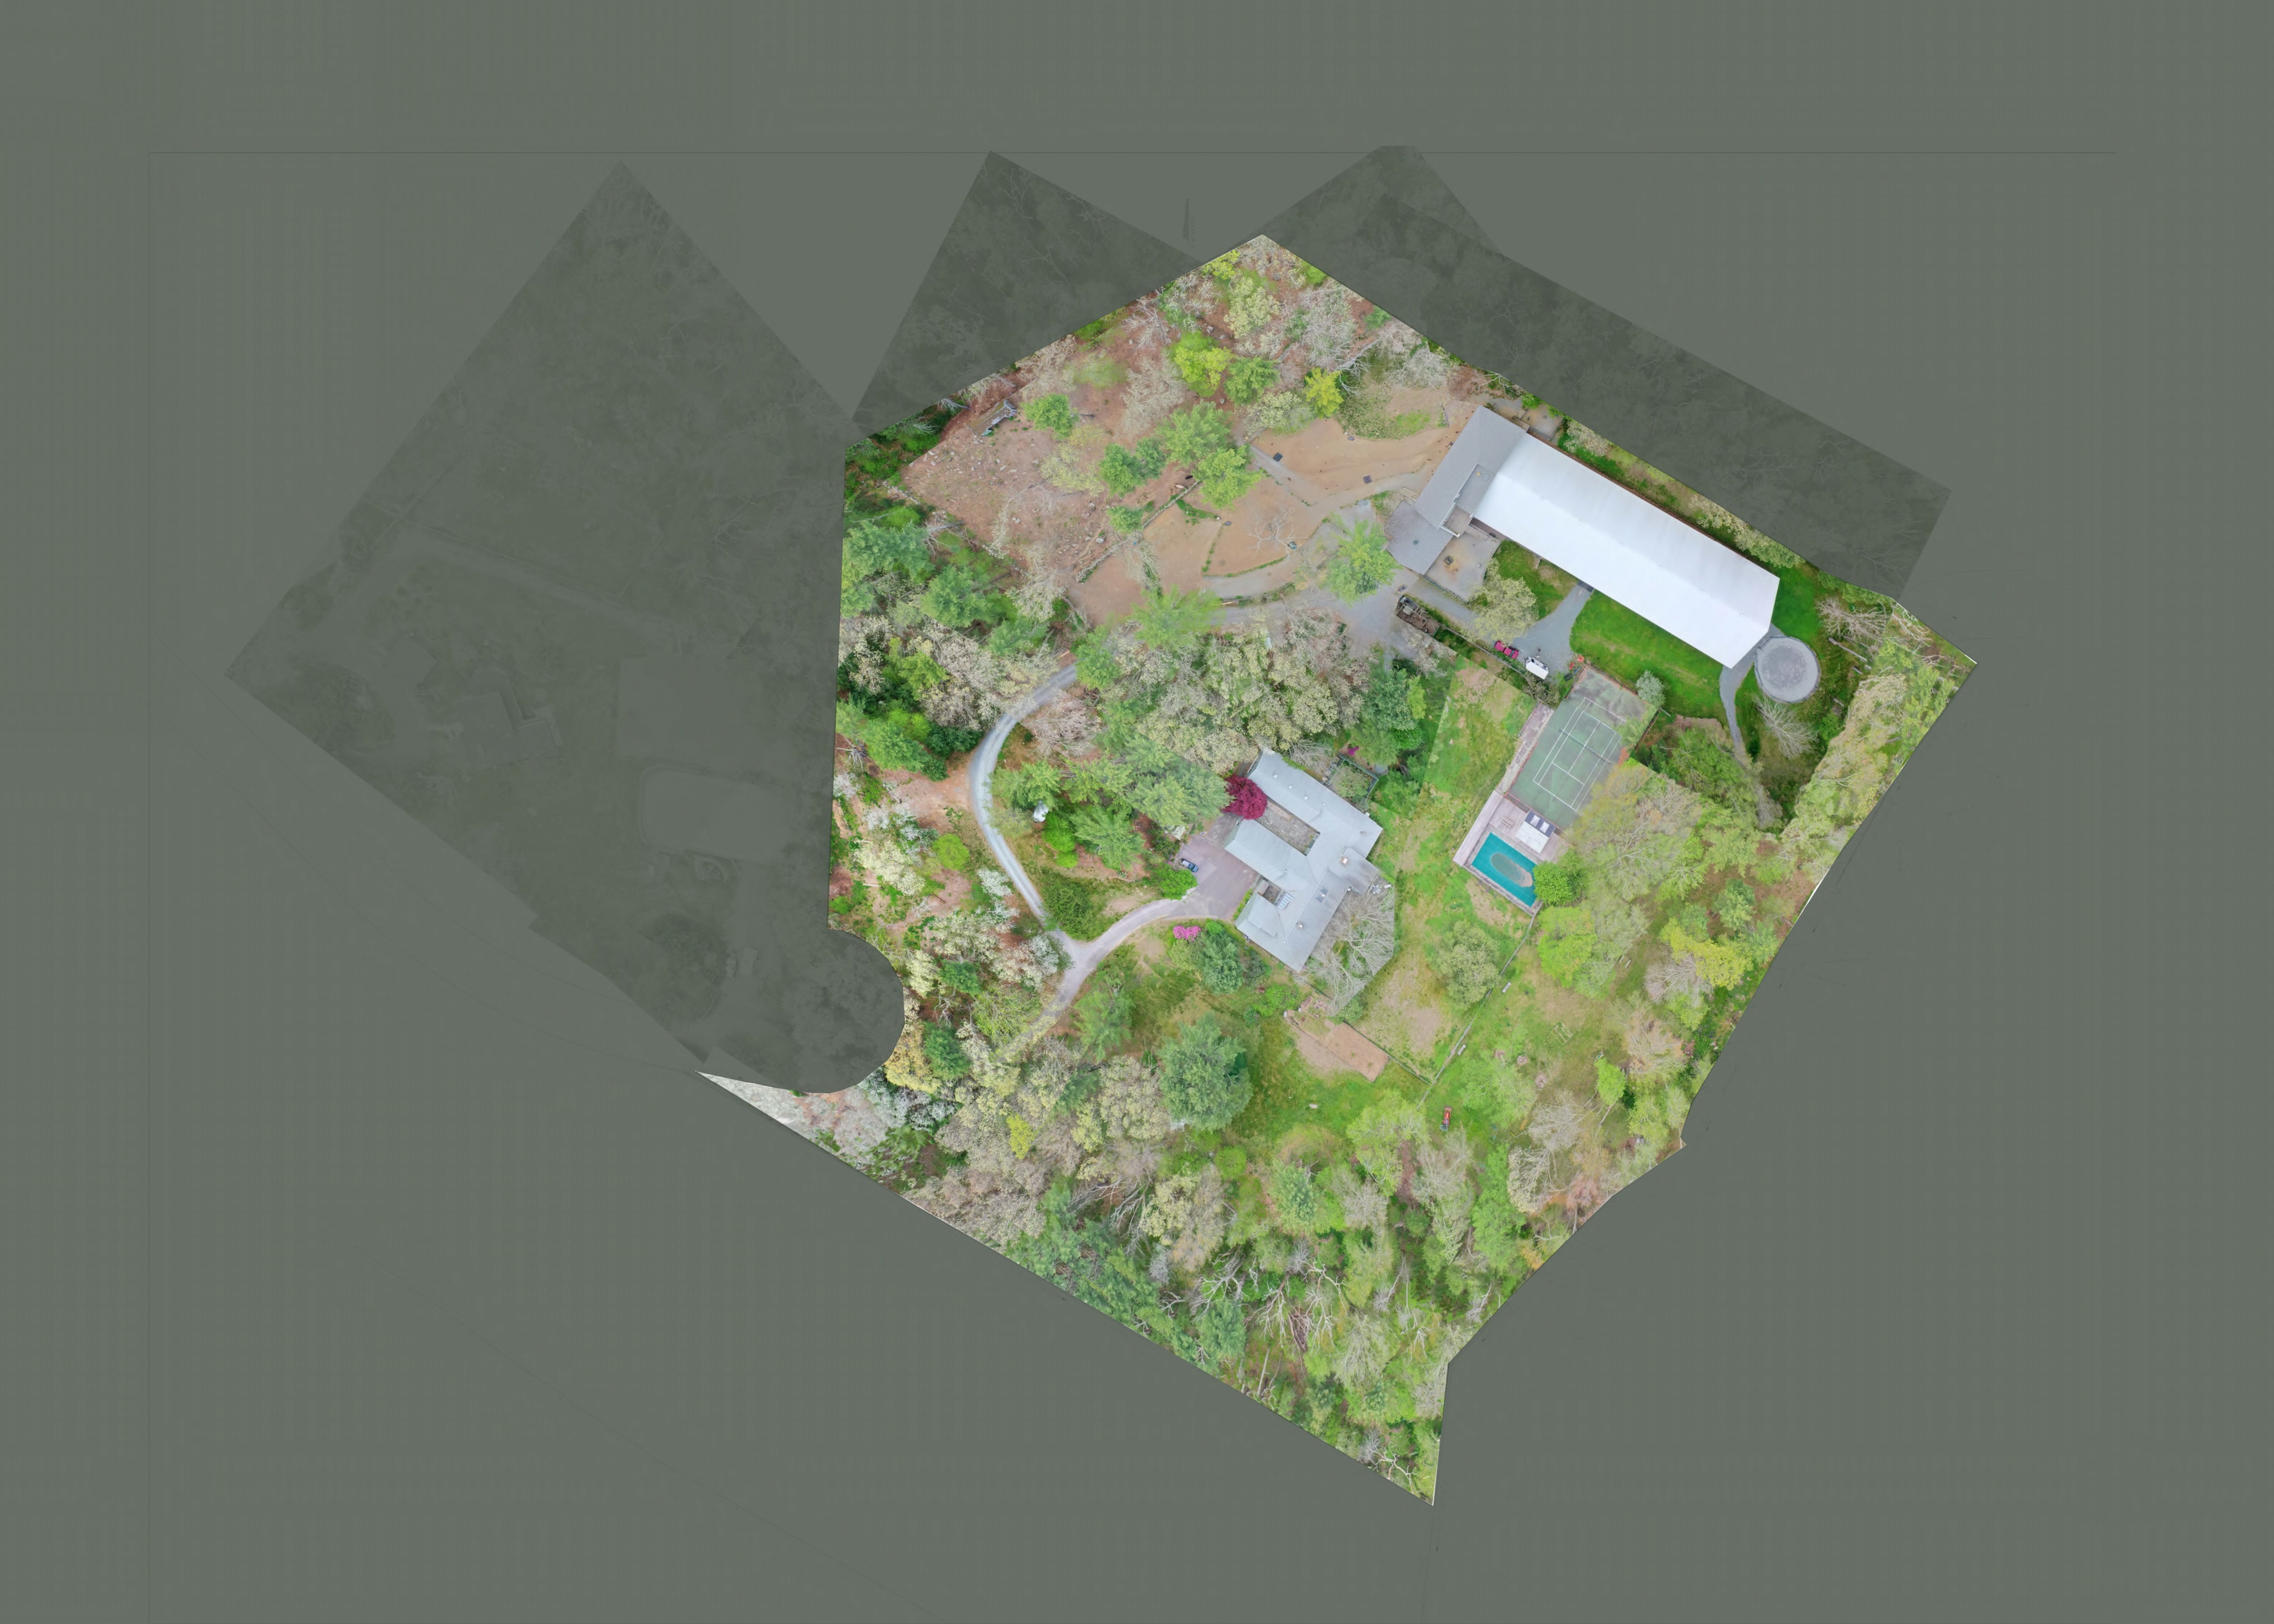
This shows the site after construction. The images outside the
property line are greyed.
(Very large version 35Mb)

Post Construction Activity
Addition of Big Ass Basic 6 Fans
)
)
)
)
Wildstar Farm got the Basic 6 model with 24 foot diameter blades.
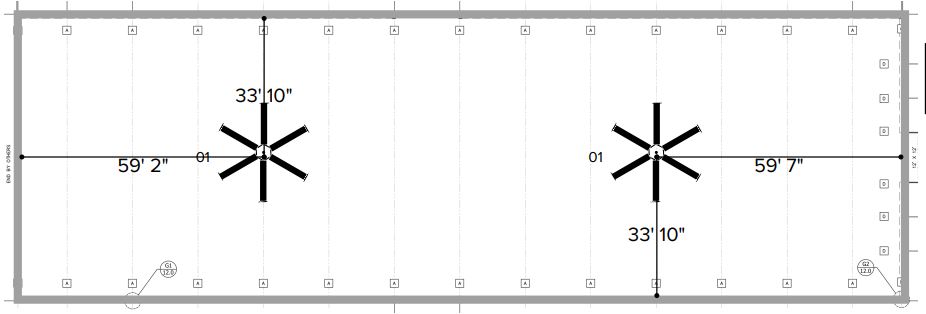
Locations, Big Ass flow model and installation recommendation.
| Engineering Issues | |
|---|---|
| On 5 August 2024 Jon West of Big Ass Fans sent this note: | "We sent a 10'
down rod so this should help clear the slope... The 10' down rod will have the blades spinning 150" (12.5') from the mounting point." |
| On 17 February 2024 Alan Ball of Calhoun Super Structures sent this note regarding installing the Big Ass fans: | "We have reviewed the data sheets provided.
Based on the weight of the fans, we do not see any concern mounting 2 or 3 of these units in the structure. We suggest that you use the fan supplier's mounting kit. Please note that the fan must be connected to the lower chord of the truss (3x3 square). It is not permissible to connect to the purlins (z-shaped members that run the length of the building)." |
The engineering issues and discussions resulted in this fan bracket design to adapt the standard Big Ass mounting brackets to the Calhoon truss.
Fan Bracket Design (stamped copy)
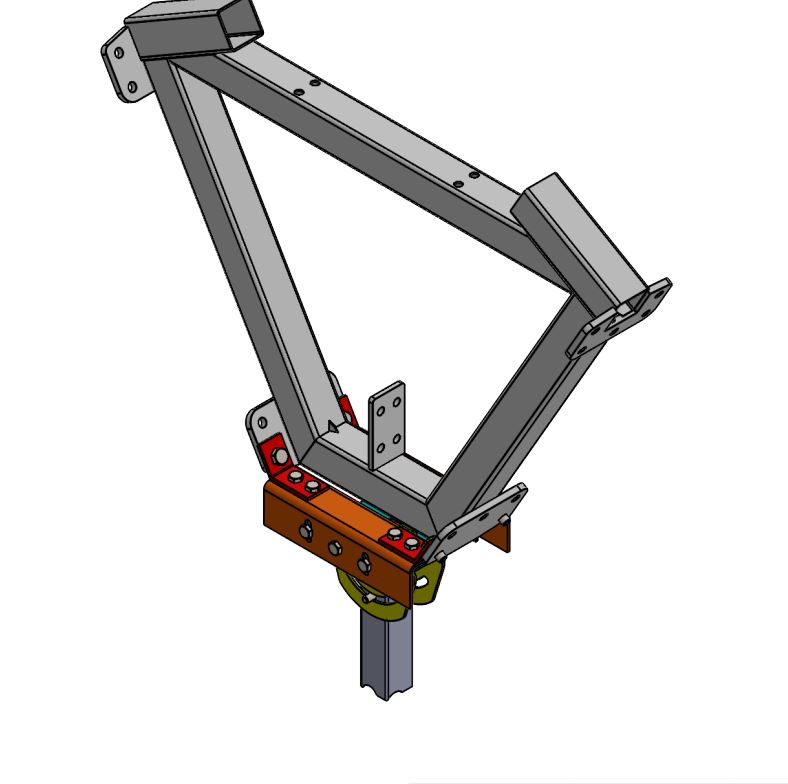
Note: The large grey triangle in the image above is the center section at the top of each truss.
The small red angle brackets which adapt the orange flat fan plates to the angled bolting points of the truss are the only parts not supplied in the fan mounting kit. They are detailed on page 5 of the design document.
Based on this design a Building Permit was issued (and signed off after installation).
An emergency cutoff switch  was required by the local electrical
inspector:
was required by the local electrical
inspector:
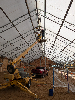
Big Ass Fan Installation
| Recommended installation instructions were found on the Big Ass Basic 6 Support Page. These seemed to be incomplete so the installation proceedure here was written by Wildstar Farm. It is in addition to the manuals from the Big Ass page. The manuals from that page which were used at the time of installation are listed with each step and more manuals and documentation are below after this discussion of the Wildstar installation. | |||||||||||||||||||||||||||||
| Step | Discussion | Manual(s) (if any) |
|||||||||||||||||||||||||||
|---|---|---|---|---|---|---|---|---|---|---|---|---|---|---|---|---|---|---|---|---|---|---|---|---|---|---|---|---|---|
| This Safety Sheet is provided by Big Ass Fans. | Safety Sheet | ||||||||||||||||||||||||||||
| Get Ready | Check for equipment and supplies needed. | Installation Checklist | |||||||||||||||||||||||||||
| Beam Attachment | Attach brackets to structural I-beams or trusses. |
Overhead
Install Guide (Step 1 in this guide)
Solid Beam Kit (not used at Wildstar Farm but motivated the mounting method used) Direct Mount Guide (not used for the Wildstar Farm installation) |
|||||||||||||||||||||||||||
| Cut Hanging Tube | As needed cut the hanging tube to achieve desired length above the floor and distance to the ceiling. (At Wildstar Farm the original 10 foot hanging tubes were cut to 7 feet.) | Tube Cutting | |||||||||||||||||||||||||||
| Mount Hanging Tube | Attach the hanging tube to the beam or truss mounting bracket. | Overhead Install Guide (Step 2-4 in this guide) | |||||||||||||||||||||||||||
| Mount Motor |
Attach the motor assembly to the bottom of the mounting
tube.
 |
Overhead Install Guide (Step 5 in this guide) | |||||||||||||||||||||||||||
| Install Guy Wires | Install guy wires between the fan motor assembly and the ceiling. These steady the fan assembly preventing swaying. The wires should be taught but not under significant tension. | Guy Wires | |||||||||||||||||||||||||||
| Electrical Installation |
Connect power to the VFD controller, make the
electrical connections from the VFD to the motor and make
the (Modbus) Cat-5 connections to the remote controllers.
The original motor connections
were updated to support 220 V single phase wiring
 using these instructions supplied with the motor. using these instructions supplied with the motor.
 Care must be taken since the diagram does not exactly
match the motor. The pin names are correct but the
placement of the ground wire is on the opposite side from
what is shown. Care must be taken since the diagram does not exactly
match the motor. The pin names are correct but the
placement of the ground wire is on the opposite side from
what is shown.
Elecrical installation tasks are step 6 in the Overhead Install Guide but are not documented there. The Electrical Installation manual link shown in this step documents this task. Wire sizes and other wiring details are in the Electrical Guidelines manual also shown here. (Some earlier documentation suggested that 30 amp circuits were required for the Basic 6 fan. This is not the case according to the latest manuals which only require 20 amp circuits. At Wildstar Farm 30 amp circuits were installed and to support that amperage 10 AWG wire was used from the circuit breakers to the VFD. Although the latest documentation does not require it 10 AWG wire was also used between the VFD and the fan motor which could have used 14 AWG.)
|
Electrical
Installation
Electrical Guidelines Onboard VFD Installation |
|||||||||||||||||||||||||||
| Test Fan Motor |
There was no useful manual provided for testing the motor
after all connections were made. At Wildstar Farm the VFD
reported an error and parameters had to be adjusted as
suggested by Big Ass support to get the fan to operate.
There is no inherently safe way to adjust parameters after
fan blades have been installed. A suggestion was made to
Big Ass Fan support on a way to use the fire turn off
connection to create a safe method of disabling the fan
and allowing parameter adjustments. It is not yet known if
this method will work.
Test the motor by putting the VFD into local mode by setting P100 to 0 and then pressing the 'Run' Button. Stop the fan and set P100 back to 3 to enable the remote controller. At Wildstar Farm the fans did not work as delivered. On initial power up the fan reported an error at the VFD and at the remote Standard Controller reported an overload. A support call answered by to Garrett H. suggested parameter adjustments to get the motor to work.
These explicit numbers were given by phone a later email reporting what was done said that the P108 and P171 were being increased by about 10%. |
||||||||||||||||||||||||||||
| Install Remote Controller |
The Standard Controller is mounted remote to the fan.
(At Wildstar Farm these remote controllers are mounted at
the entrance from the barn to the arena.)
The electrical installation above discusses how to wire the Cat-5
cable From the remote Standard Controller to the VFD.
The Standard Controller reports more
useful error information than the VFD. At Wildstar Farm
when the fans were first tested they reported 'Err' at the
VFD. On the remote controller an Overload condition was
reported. As reported above in the Testing discussion
parameter adjustements were recommended by Big
Ass suppport to correct this condition.
|
Standard Controller | |||||||||||||||||||||||||||
| Install Airfoils | Installing the Airfoil restraints and winglets is covered in an additional manual to the more general Overhead Install Guide. |
Airfoil
Restraints
Overhead Install Guide (Step 7-8 in this guide) Sheet |
|||||||||||||||||||||||||||
| Motor Controller Overload |
In June of 2025 during the first really warm period after
the fans were installed the Escessive Motor Current
symptom reappeared. Daytime temperature this day
approached 100 degrees. This problem recurred at least
threee times on both fans. While trying to get the fans to
work a low line voltage report occured once on one fan and did not
repeat. Measured line voltage was 120 volts on each phase
it was not measured directly at the fan but at the circuit
breaker.
A call to Big Ass support on July
2nd 2025 worked
with Rhonda and suggested new parameters. These could not
immediatedly be updated but will be set over the next week
or two. She also suggested cleaning the blades from any
dust accumulation (none was observed).
|
||||||||||||||||||||||||||||
| 8/20/25 Fan did not start |
The above change was accomplished about 8/20/25. The near fan worked. There was an immediate
failure when the change was applied at the far fan. A short power
cycle did not clear the error. Additional changes were suggested
and made as follows. No further error occured. If one does occur
they plan to send a new motor. (See note with Motor
Calibration instructions below.)
|
||||||||||||||||||||||||||||
Motor Calibration
| When Wildstar was having issues with a fan not starting on 8/20/25 BigAss fan support provided these Motor Calibration instructions by email. They were not performed (yet) since they have to be performed on a lift at the fan and were provided after the last fan parameter update was performed. |
| Follow these steps to calibrate the motor on Basic 6 and PF8, this procedure can only be performed at the VFD |
|---|
| 1. Press M (mode) on the keypad it will show PXXX, navigate to P100 using the directional arrows (press and hold to scroll if necessary). |
|
2. Once at P100 press the M again to see the parameters
value.
***P100 needs to be set to 00 in order to calibrate, DO NOT PRESS the Green Run button at any time other than when instructed. *** Note the value, then set the value to 00 and press M to save. |
| 3. You will see STOP displayed on the keypad, press M to enter back into the parameter menu and use the up arrow to go to P399. |
| 4. Press M on the keypad it will show the value 0, use the up arrow and change the value to 2 and press M to save. The letters CAL will appear on the VFD screen, now you may hit the green button to run the calibration (the fan will not start, it will calibrate). The display will flash, and you may hear some electrical sounds, when you see STOP displayed, the calibration is complete. |
| 5. Press M and return to P100, press M again and set the value to its previous setting noted in Step 2, then press M to save and exit the menu. You are ready to go to the ground-based controller and test the fan. |
Big Ass Documentation and Manuals
Instructions on
how to run the fan Standard Controller are on the Big Ass
web site
but not available as a PDF file manual. These instructions say:
| Press the power button to turn the fan on/off. |
| Tap or press and hold + to increase the fan speed. |
| Tap or press and hold - to decrease the fan speed. |
Maintenance and Errors:
Fan Maintenance Manual
Error Codes
Fire relays were supplied with the fans but are not appropriate to the Wildstar Farm installation. They are required when the fans are located in an area with a sprinkler system and are expected to shut off the fans when the sprinklers actuate.
Fire Relay Kit
Manual inappropriate to this installation on the Big Ass site:
Bar Joist Manual
Videos on the Big Ass site for various beams inappropriate to this installation:
Bar Joist Mounting Video (8 feet between or less)
Bar Joist Mounting Video (more than 8 feet between)
I beam video
Z Purlin video
A discussion of how to mount to structures other than those in the list above was not on the site. More appropriate information was in the older installation guide:
Older pre Sept. 1999 Big Ass Installation Guide (local copy) with diagrams.
Handicap Lift
A Jib Crane was constructed to lift handicapped individuals onto
horses.

Chicken Palace
Construction Records
Photos of Construction Progress
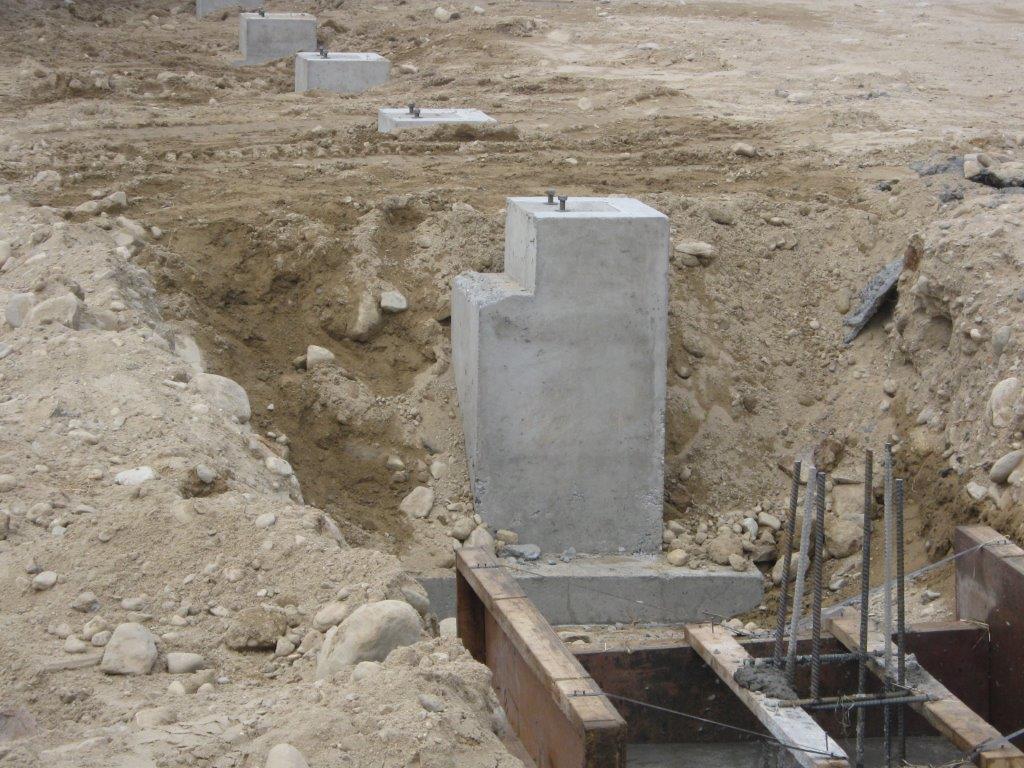
Completed foundation for the new barn
Construction
Photo Essay Many more photos of the whole construction
process.
Time Lapse Arena Erection
| Day 1 Wednesday 24 January 2018 |
|
Day 2 Thursday 25 January 2018 |
|
Day 3 Friday 26 January 2018 |
|
Day 4 Saturday 27 January 2018 |
|
Day 5 Sunday 28 January 2018 |
|
Day 6 Monday 29 January 2018 |
|
Day 7 Wednesday 31 January 2018 |
|
Day 8 1 February 2018 |
|
Day 9 2 February 2018 |
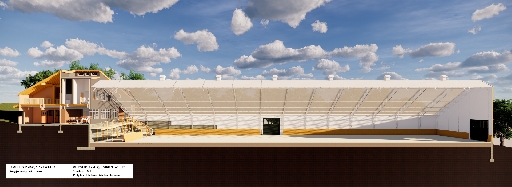
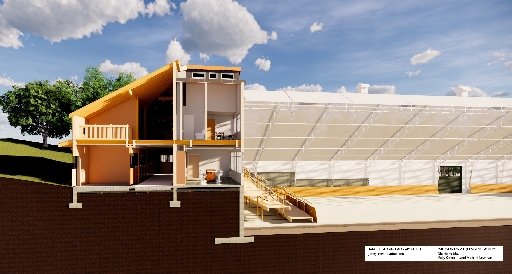
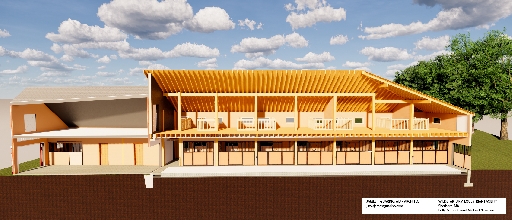
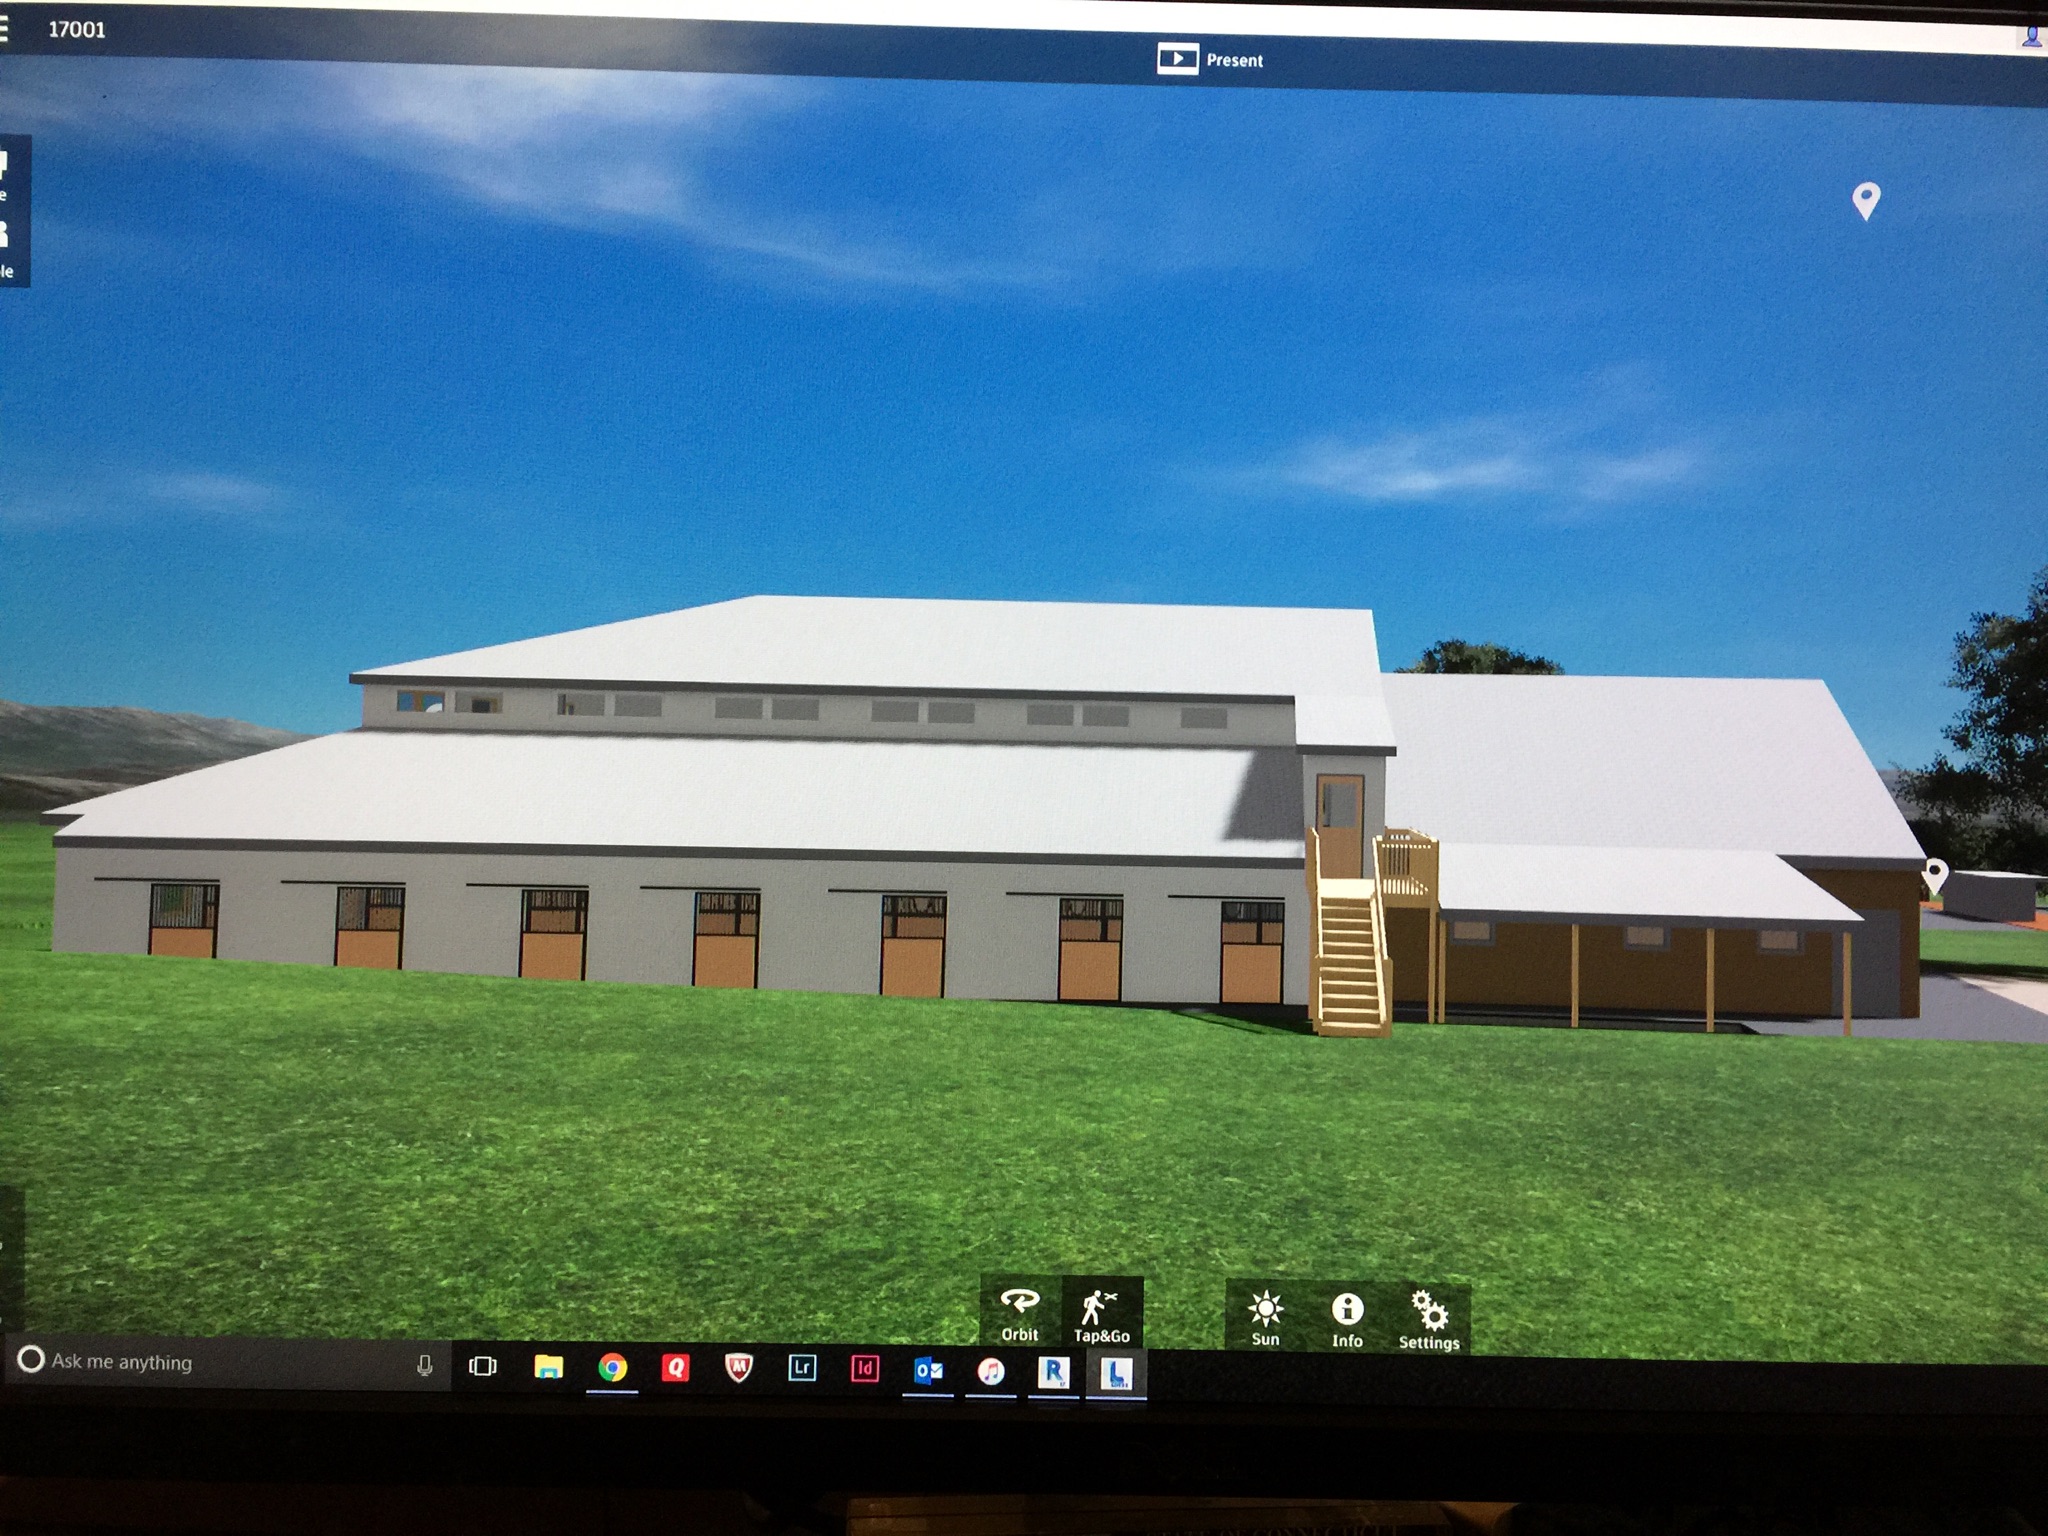
Latest Architectural Renderings
Cross section looking east in the middle of barn and arena:
Similar cross section looking east in the middle of barn and arena
showing greater barn detail:
Cross section looking north showing the barn north of the aisle:
Pre-Construction Renderings
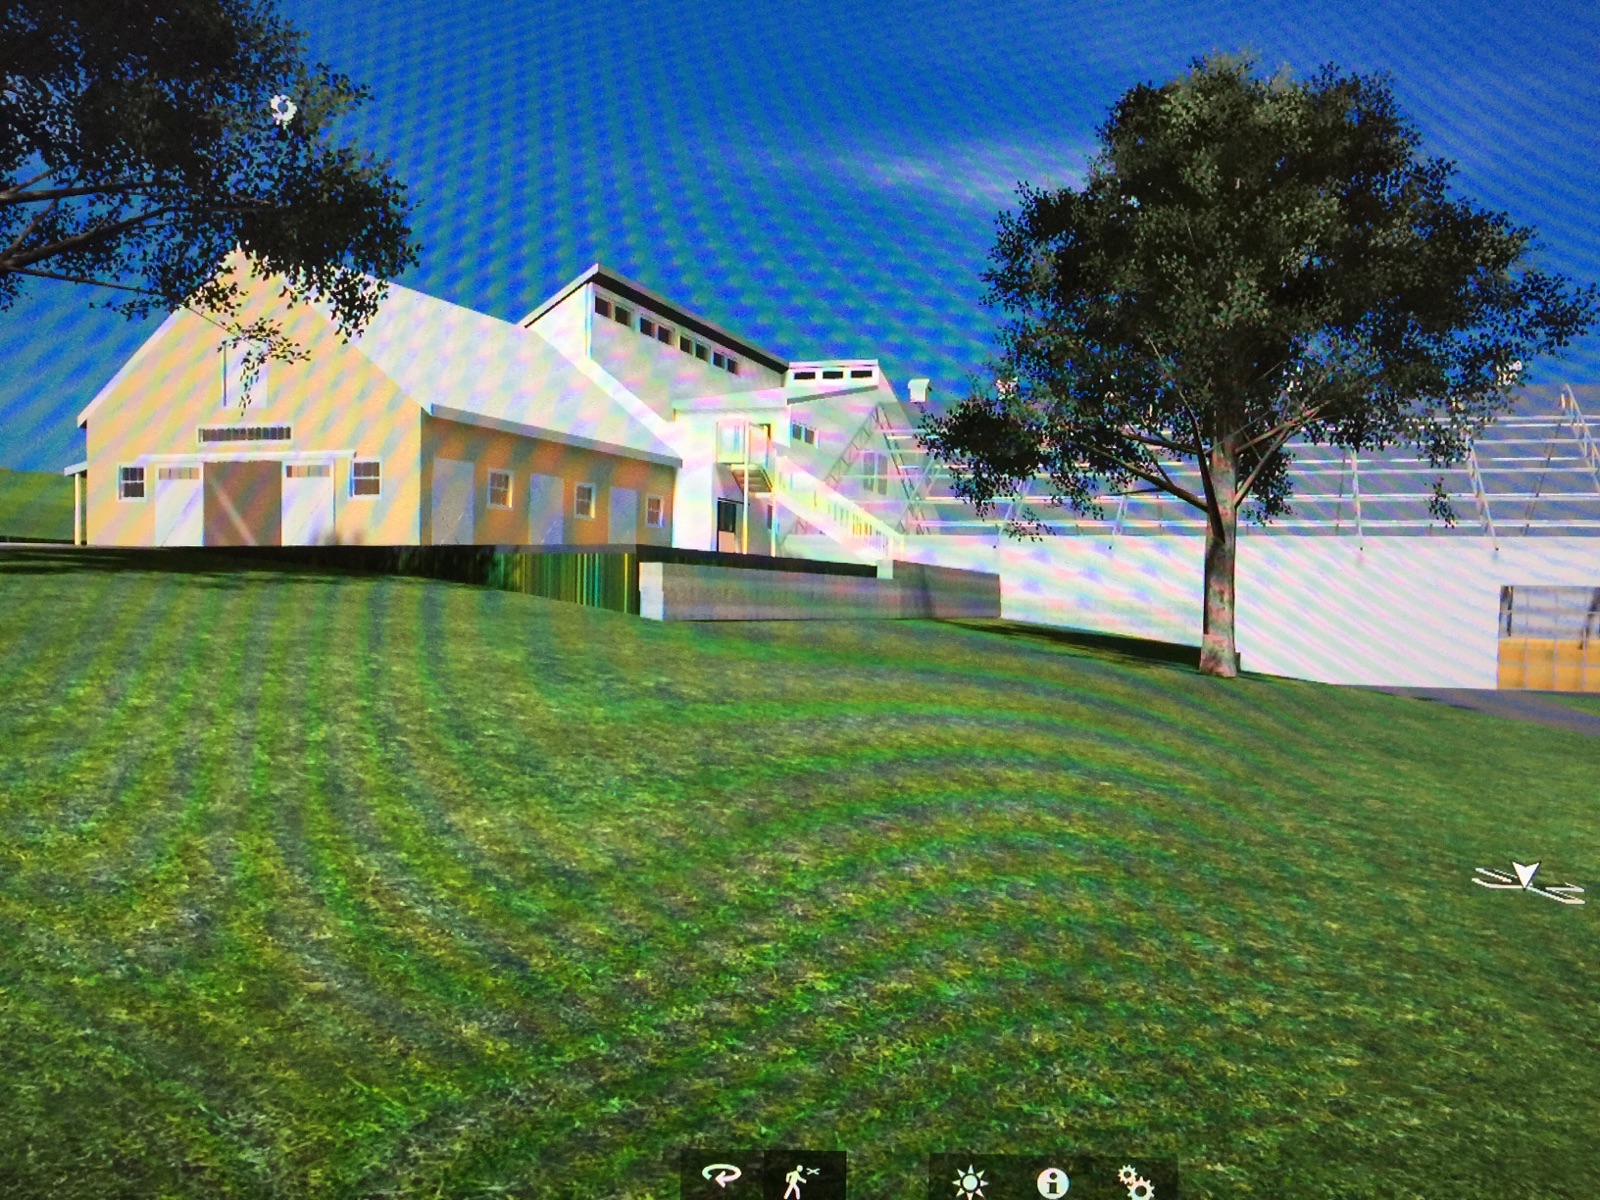
Pre Construction Site View
Aerial View
Bedroom Looking
East
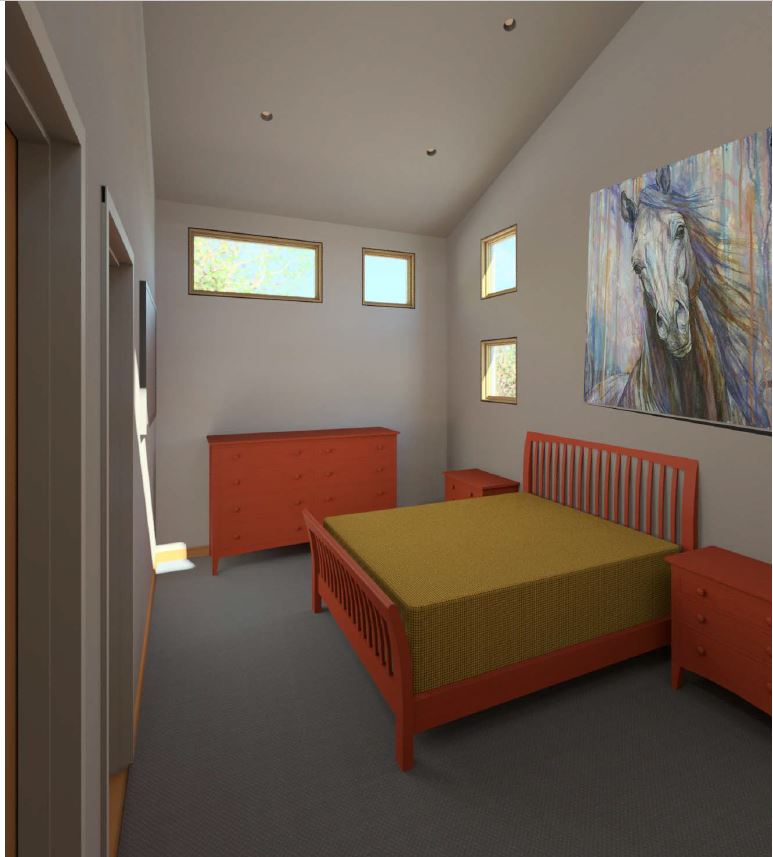
Bedroom Looking
West
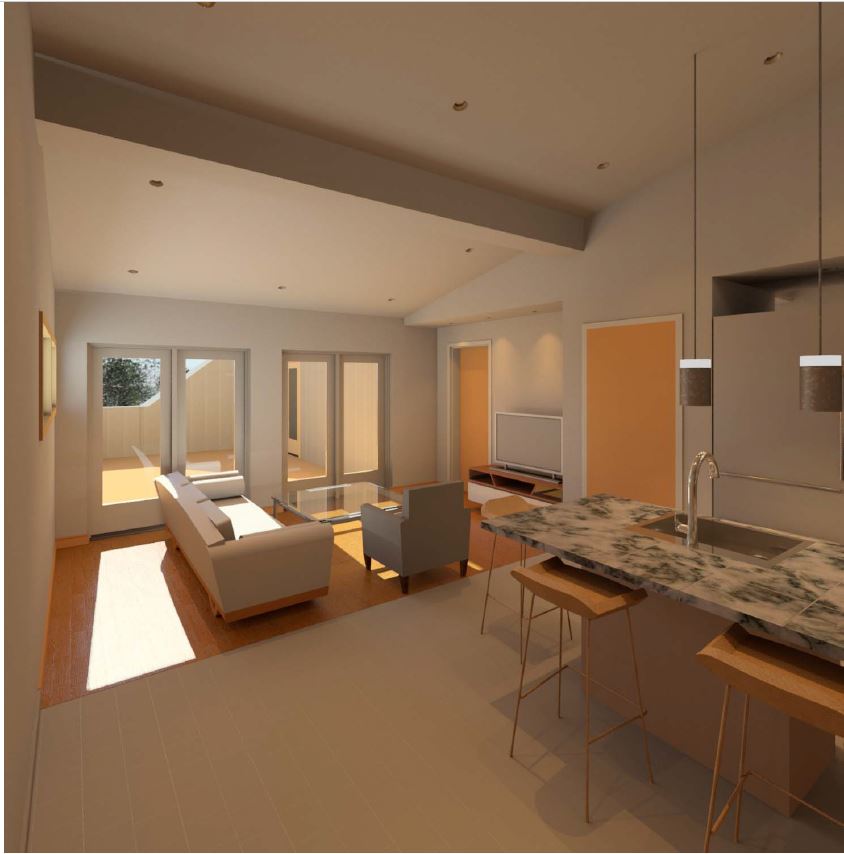
Living Room
Looking East
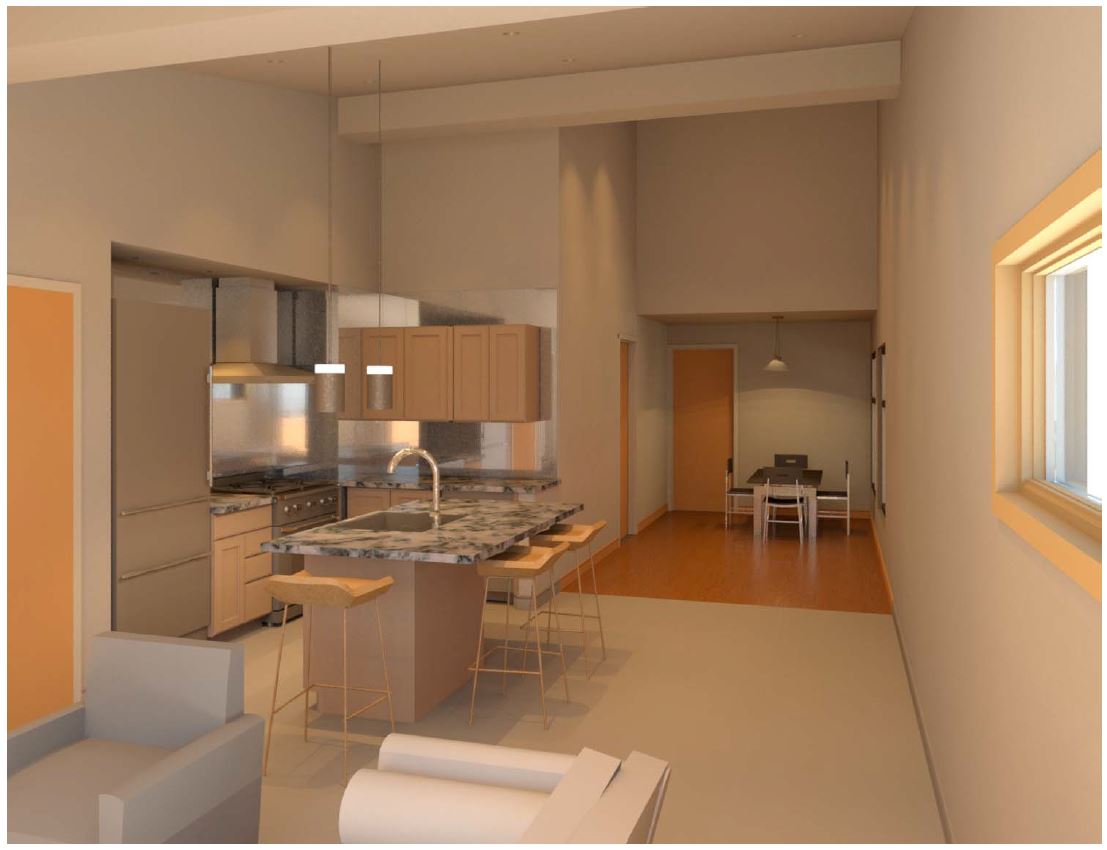
Living Room
Looking West
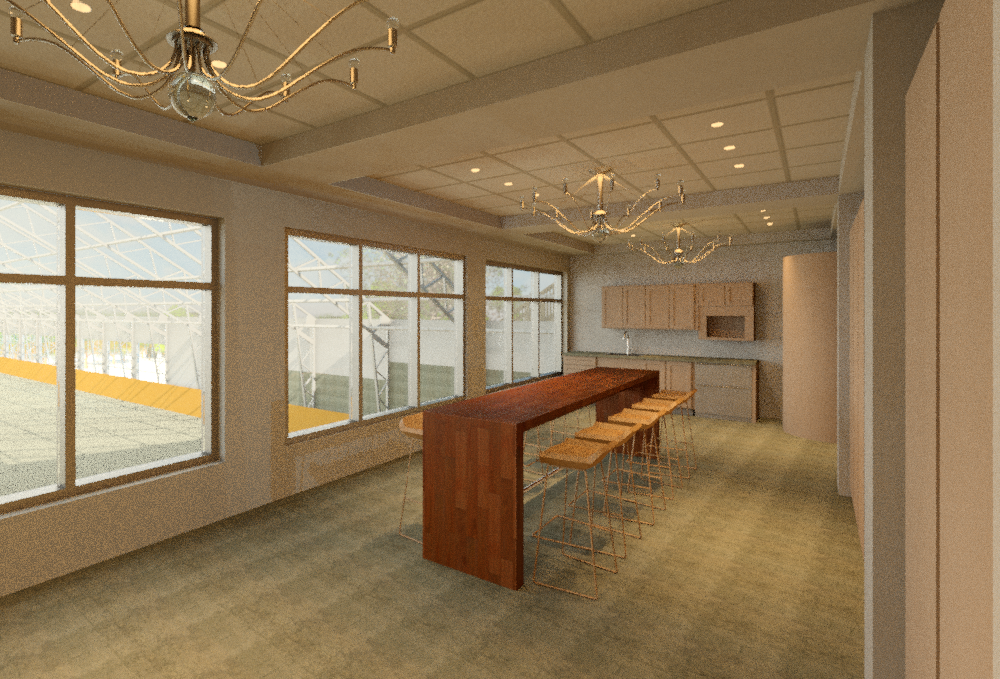
Dining Room
In Tack Room
In Ring
Looking South
Looking East
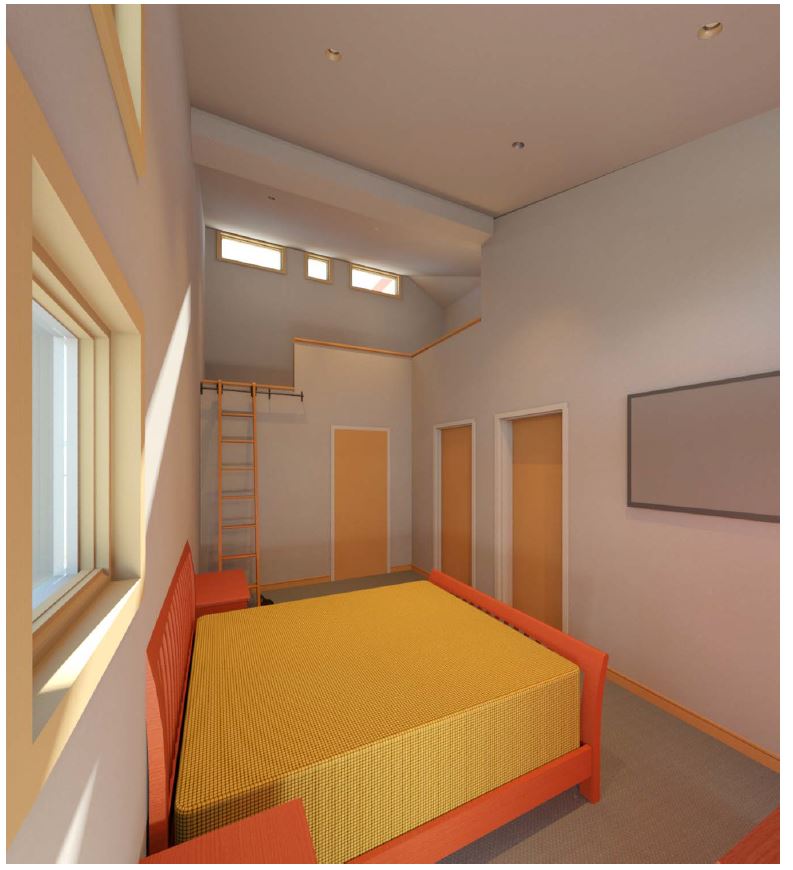
Tack Room
Upstairs
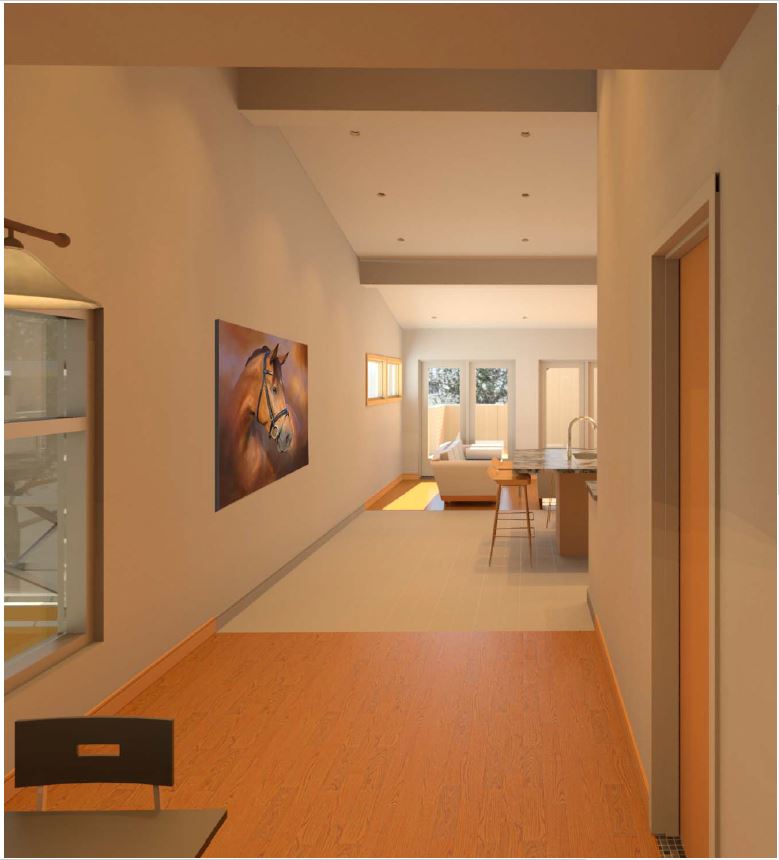
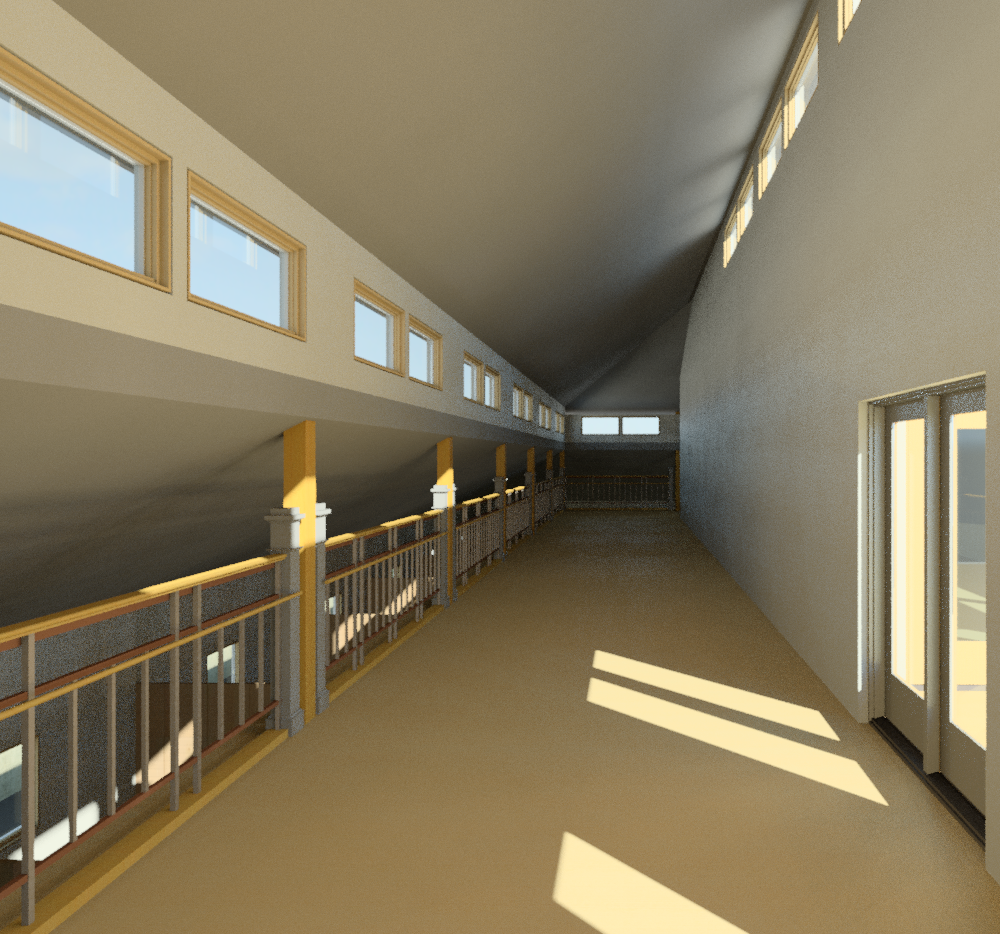
Hall Rendering
Inspections and Post Completion Reports
2022 Fire Alarm Inspection At this time an updated cellular radio was installed that eliminated the need for a backup phone line.
Completion Reports and Affidavits
After completion of the project at the time the apartment Special Permit came up for renewal Wildstar submitted a letter justifying that the apartment did not need a Special Permit. Chris Canney the building inspector responded on 27 May 2020 by email in this way:
Sorry for the delayed response, it has been a busy couple of weeks at the Building Department. I think your letter does a good job of spelling out the size and scope of the agricultural use of your property and connects the use of the apartment directly to the care and maintenance of the animals living in the barn. I agree with your assessment that the apartment is incidental to the agricultural use and therefore is not subject to the local Zoning Bylaw�s Special Permit requirements per MGL 40A Section 3. As you state at the beginning of the letter, if the use of the apartment changes in the future to no longer be directly in support of, or incidental to, the agricultural use of the property, then you will be required to obtain a Special Permit for the new use.
Since the Sherborn General Bylaw requires that I conduct an annual stable inspection, I will have plenty of opportunities to visit the property and ensure that the agricultural use is maintained.
Certificate
of Occupancy
(via
ftp 115Kb)
Building
Permit with all final signatures.
(via
ftp 550Kb)
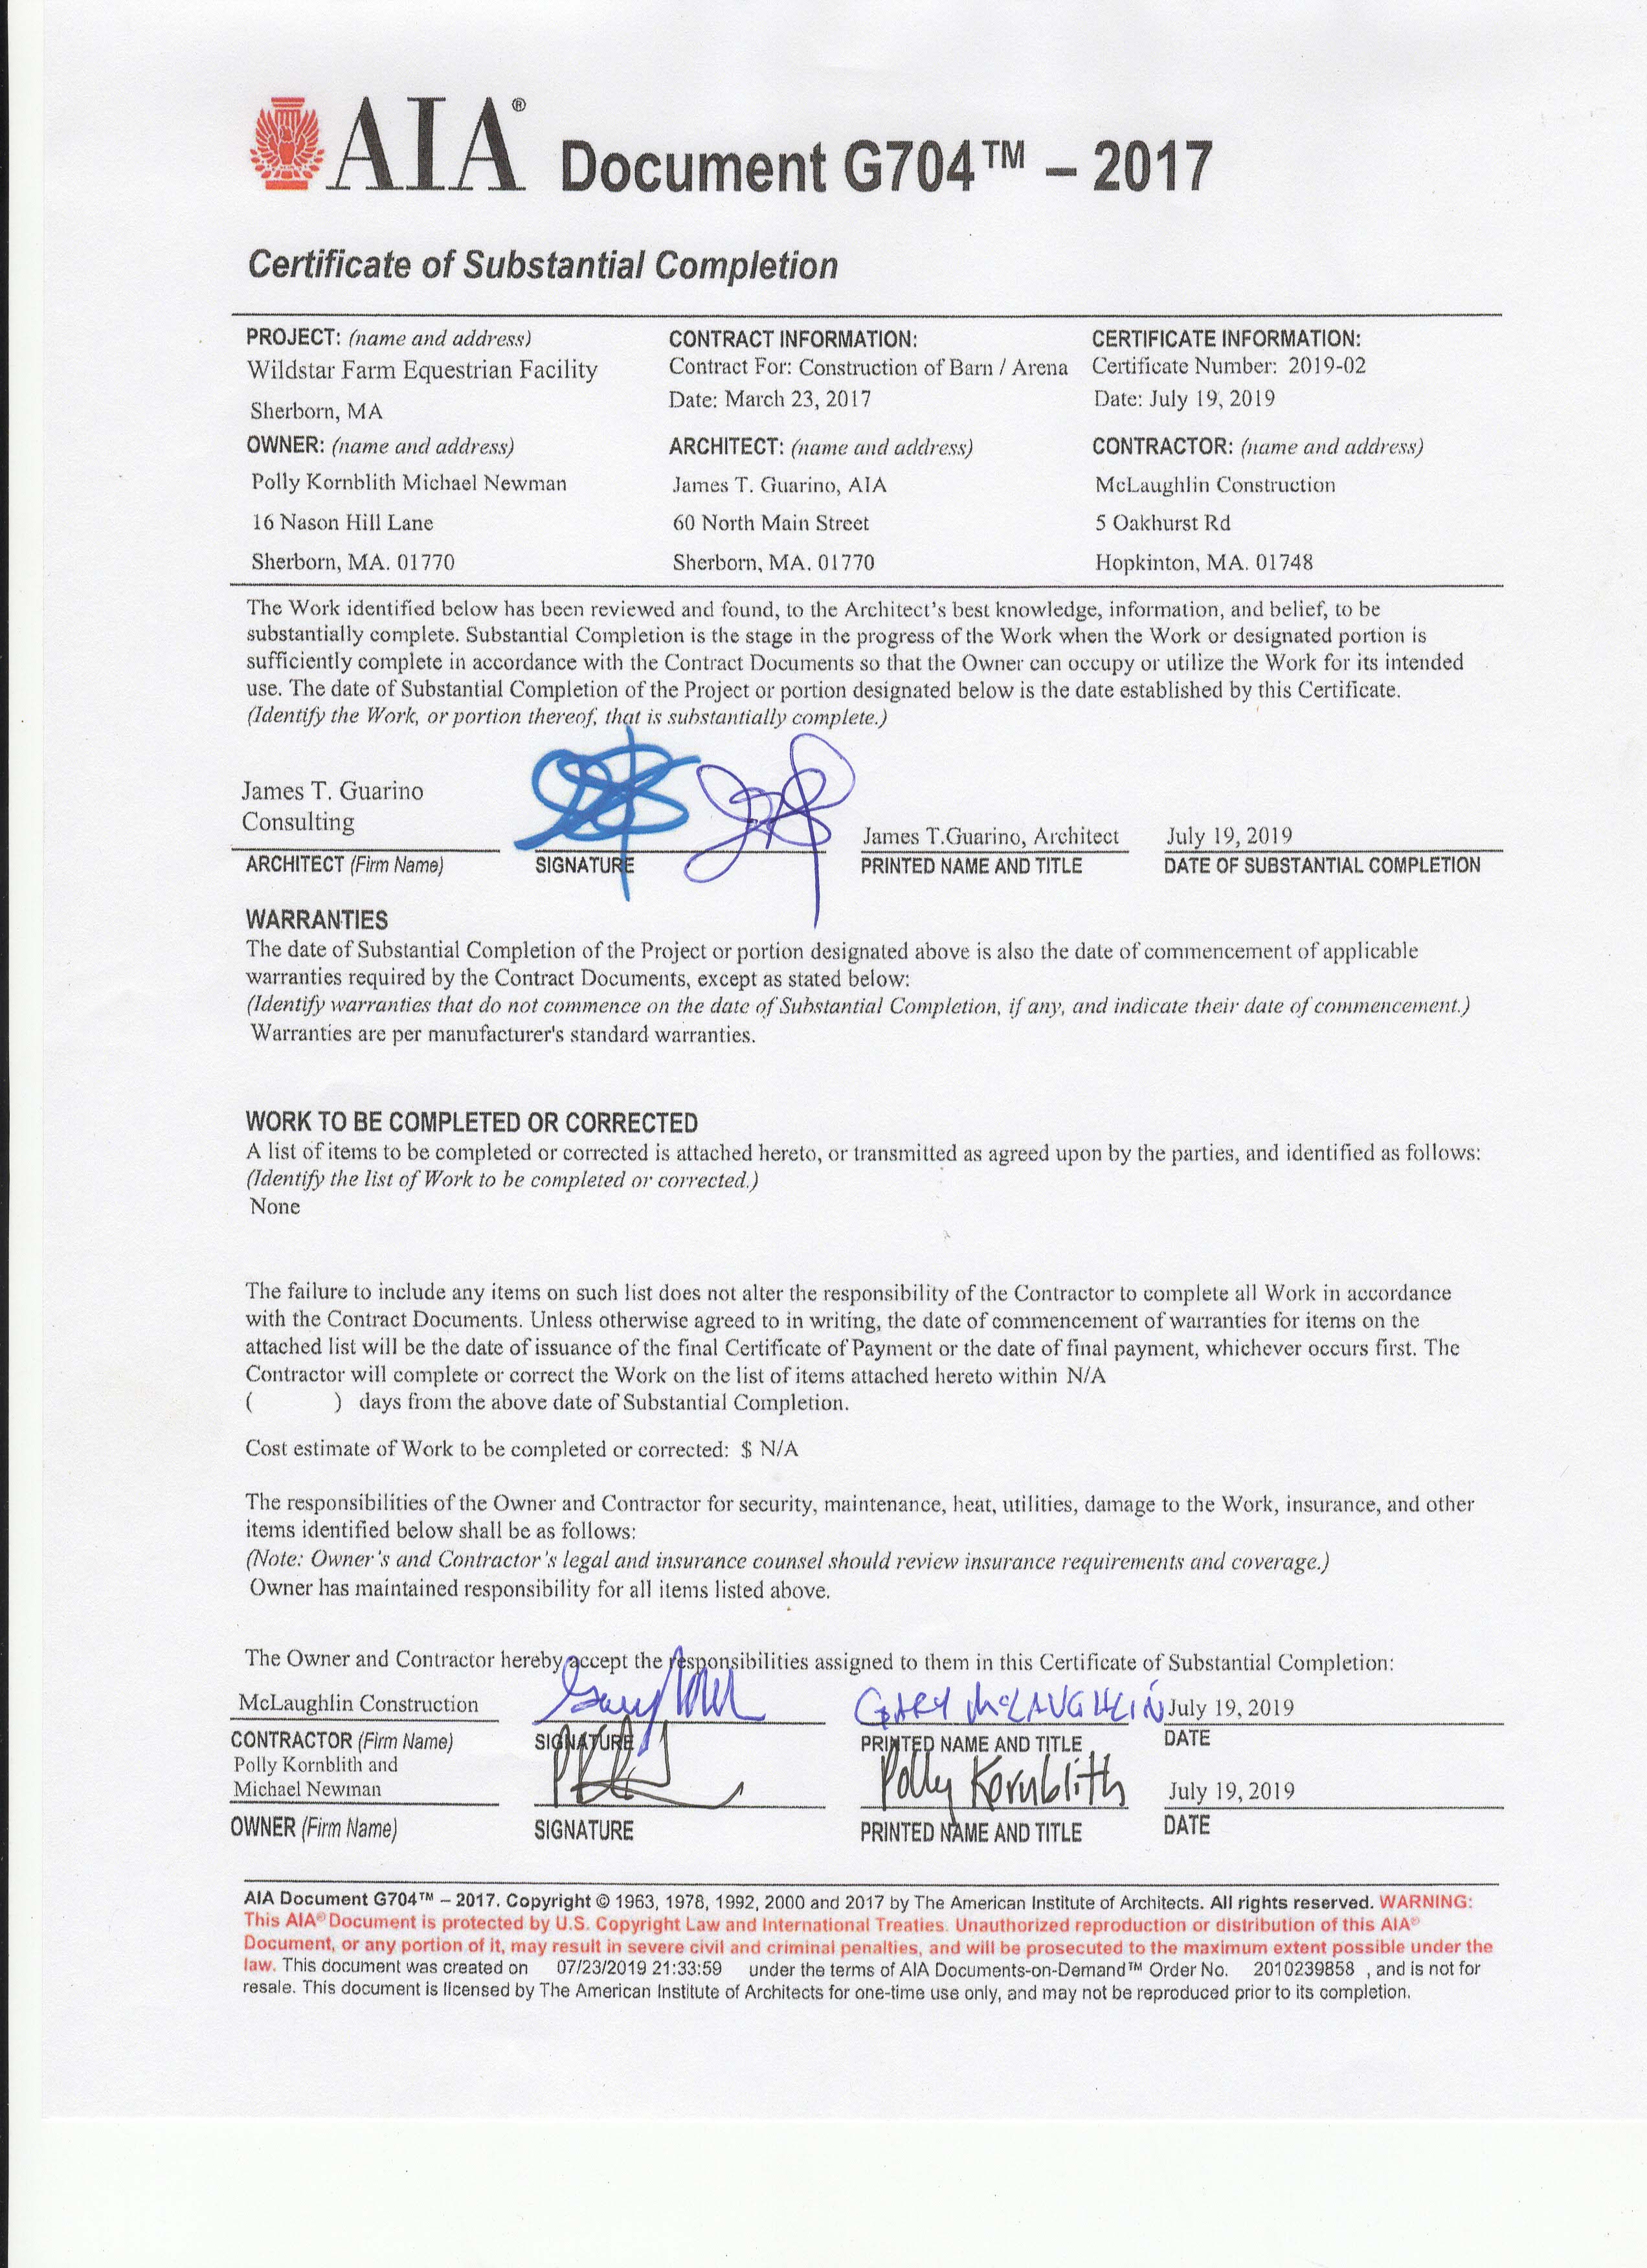
Wet
signed Certificate of Substantial Completion
(via
ftp 1.6Mb)
Pool Cabana and Barn Septic
Certificate of Compliance
(via
ftp 2.6Mb)
Final
Construction Control Affidavit
(via
ftp 43Kb)
Final
Field report 7/27/19
(via
ftp 6.5Mb)
(this final report contains all prior field reports)
Structural
Engineer Report
(via
ftp 8.3Mb)
April 2019.
Structural
Engineer Fax Cover sheet
(via
ftp 209kb)
April 2019.
Structural
Engineer Affidavit
(via
ftp 60kb)
April 2019.
The architectural design was done in Revit. The Revit design is kept in the A360 system that the Architectect uses to share the design. A360 3D Model (Revit Design) A login is required to access this design. Extracted data in PDF format is published later on this page.
Construction Details
Sliding Door
The last construction task was the design:
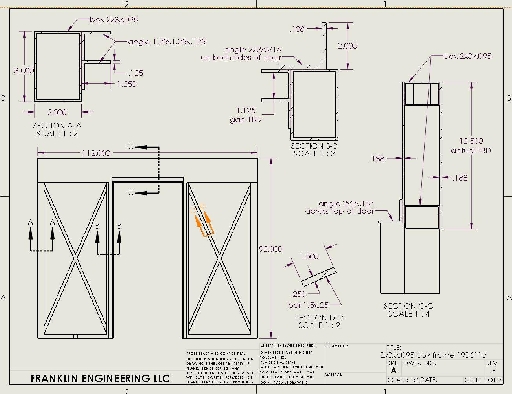
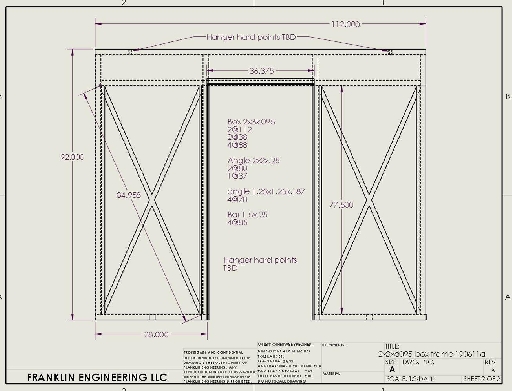
construction
and installation:
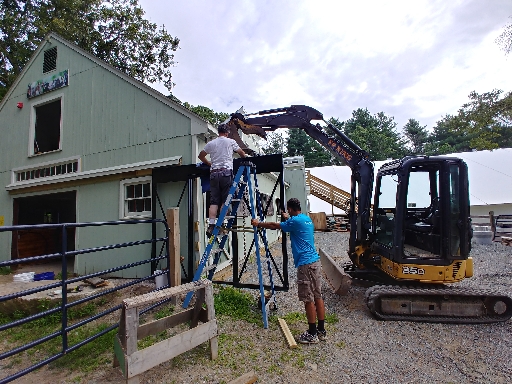
of
this barn door:
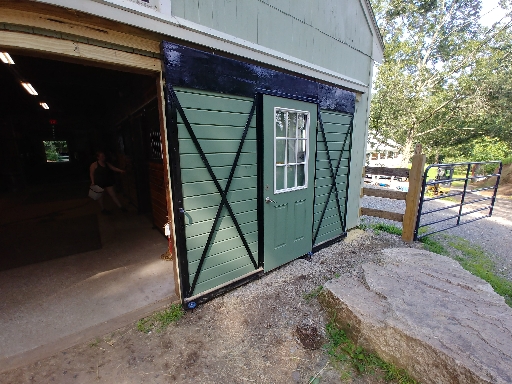
The man door in the middle is provided so the sliding door provides a
legal handicap exit.
If the sliding door is open far enough that the
man door becomes obstructed than there is a sufficient opening to
satisfy the handicap exit rules.
Structural anlysis was done on this door because the top section is
fairly narrow 2 by 3 steel channel and a top panel with steel
plates was required to satisfy wind loads:

and the possible load of
sliding the door into an obstruction:

Barn Permit Plans Egress Update (revision 4)
These plans were submitted to amend the exit route allowing egress through the sliding door of the old barn. The egress is enabled by putting a man door in the sliding door and positioning the man door so that if the sliding door is opened an acceptable egress exists when the man door passes beyond the side of the aisle opening.
Egress
Paths through the 6 bay old barn.
Top View of
sliding door assembly showing critical dimensions. This view also
shows that the sliding door track is at a slight angle to
facilitate window frame clearance.
Elevation View
showing end view of the barn with the sliding door positioned at the
critical point where the man door starts to be obstructed.
Section View
showing proposed mounting methods for the tracks.
Barn Permit Plans Apartment Update (revision 3)
These plans were submitted to amend the building permit a second time. They add the apartment and raise the roof in the hayloft perimeter to make better use of the hayloft space. Unfortunately the north windows of the apartment have to be eliminated to accomplish this.
3D
Views
Code
Summary page 1
Code
Summary page 2
Overall
Plans
Barn
Level 1 enlarged plan
Barn
Level 2 enlarged plan
Roof
Plan (enlarged)
Overall
Building Elevations
Building
Elevations enlarged sheet 1
Building
Elevations enlarged sheet 2
Interior Elevations
Building
Sections sheet 1
Building
Sections sheet 2
Wall
Sections sheet 1
Wall
Sections sheet 2
Window
and Door Types and Details
Arena
Ramp and Egress Stair
Stair
and Ramp Details
Reflected
Ceiling Plan
A360
3D Model (Revit Design) A login is required to access this
design.
Barn Permit Plans Raise Roof (Revision 2)
These plans were a draft of what to submit to amend the building permit to add the apartment. They add the apartment and raise the roof in the hayloft perimeter to make better use of the hayloft space. Unfortunately the north windows of the apartment have to be eliminated to accomplish this.
3D
Views
Code
Summary page 1
Code
Summary page 2
Overall
Plans
Barn
Level 1 enlarged plan
Barn
Level 2 enlarged plan
Roof
Plan (enlarged)
Overall
Building Elevations
Building
Elevations enlarged sheet 1
Building
Elevations enlarged sheet 2
Interior Elevations
Building
Sections sheet 1
Building
Sections sheet 2
Window
and Door Types and Details
Arena Ramp and Egress Stair
Stair and Ramp Details
Barn Permit Plans Bathroom Update (revision 1)
These plans will be submitted to amend the building permit of 28 December 2017 adding the first floor bathroom and the kitchenette sink..
Tack
room toilet area.
Saddle
Carosel and Tack Lockers.
Windows
to the arena
Door
to owners tack room.
Kitchenette
Toilet
east wall.
Toilet
north wall.
Toilet
south wall.
Toilet
west wall.
Laundry
east wall.
Laundry
west wall.
Permit Plans Update Removes 'Future' Items
These plans update the overall design to remove all mention of the apartment, bathroom and fixtures that require plumbing (listed as future items in the 12/28 permit plans). They were required by the town to issue a building permit for the barn while pool septic system repair was incomplete. Everyone agreed that the plans could be amended to add the septic related systems once the pool septic repair was complete.
Enlarged
Plan Barn Level 1
Enlarged
plan Barn Level 2
Building
Sections sheet 1
Building
Sections sheet 2
Wall
Sections
Barn Permit Plans
These plans were submitted for a building permit on 28 December 2017.
3D Views
Code
Summary Sheet 1
Code
Summary Sheet 2
Overall
Plans
Enlarged
Plan Barn Level 1
Enlarged
plan Barn Level 2
Roof
Plan
Overall
Building Elevations
Enlarged
Building
Elevations sheet 1
Enlarged
Building Elevations sheet 2
Building
Sections sheet 1
Building
Sections sheet 2
Wall
Sections
Arena
Ramp and Egress Stair
Stair
and Ramp
Details
Ceiling
Plan
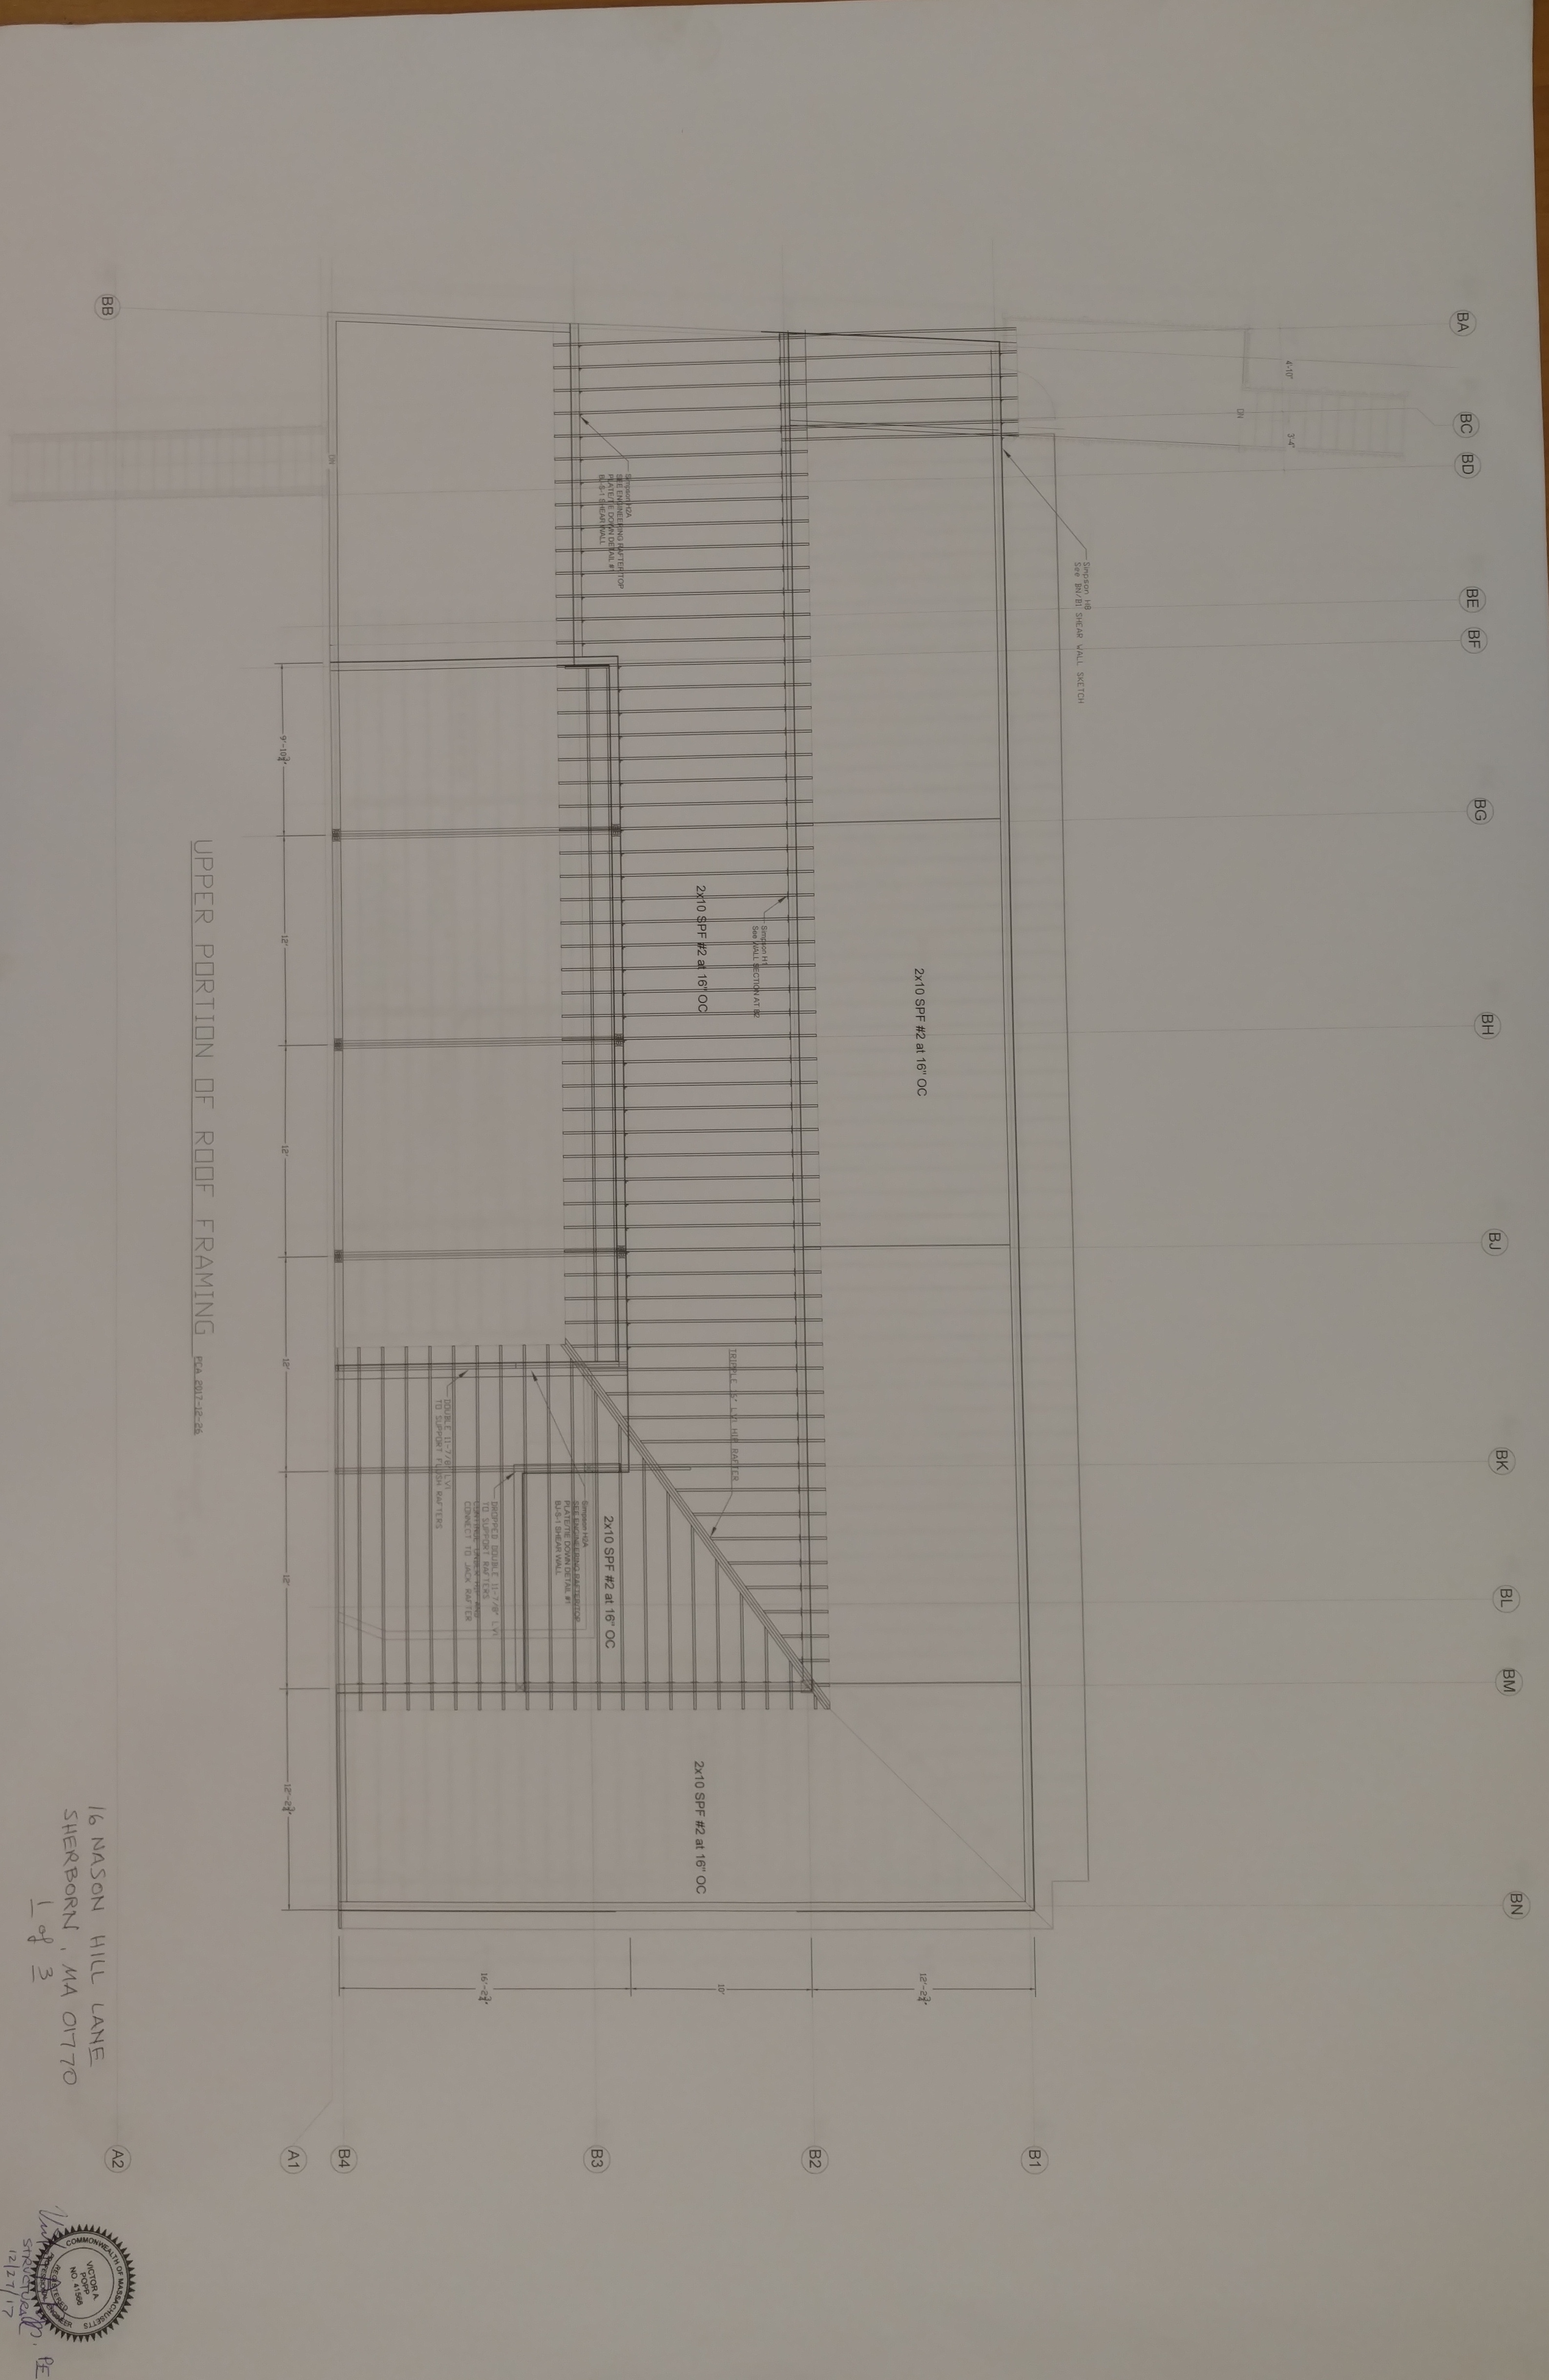
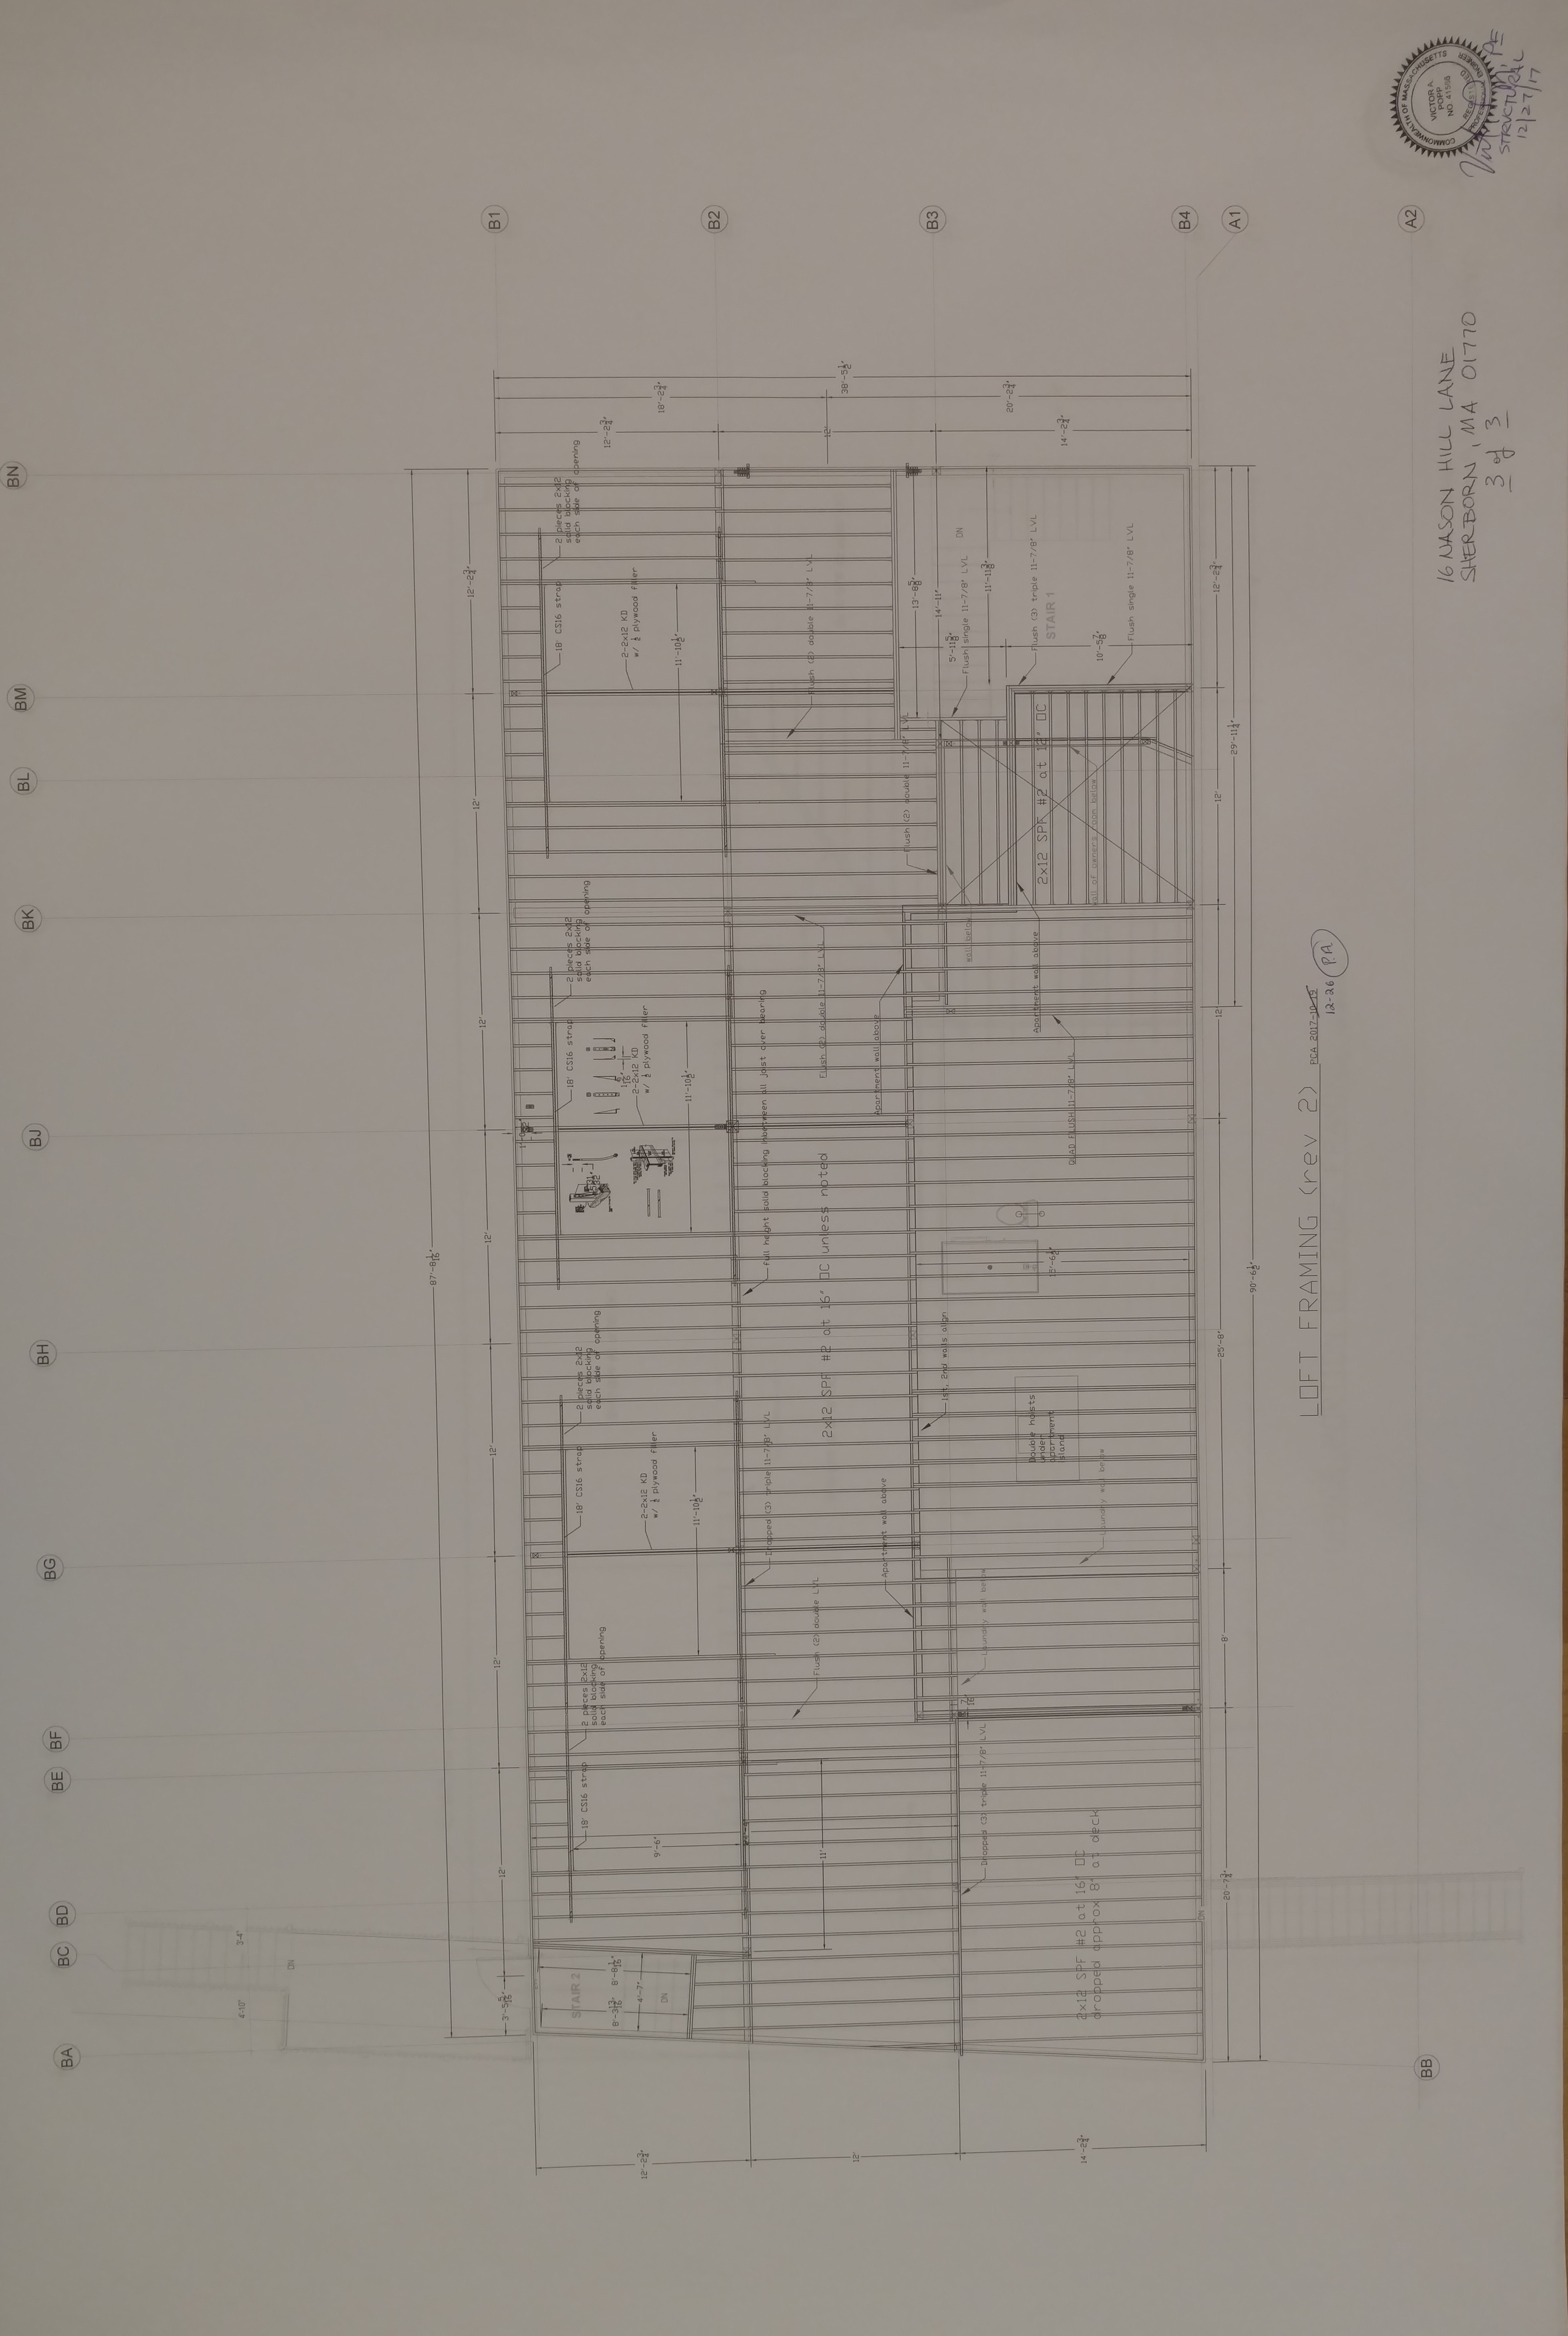
Structural
Design 1
Structural
Design 2
Structural
Design 3
Structural Analysis
Structural Analysis was done by Victor Popp. Producing these documents:
Report
on as built design
Affidavit
Fax
Cover sheet
As Built Foundation Plan
As Built foundation plan: AsBuiltFoundation.pdf (via ftp 86Kb) by Colonial Engineering. CAD data for the As Built foundation plan: AsBuiltFoundation.dwg (via ftp 192Kb).
Foundation Plans Moved for Survey Issues
Final survey data showed the barn to be 6 inches off in the GLM
survey. The arena and new barn positions were adjusted to maintain
setback clearances. These new positions are reflected in the
architectural plans dated 17 September 2017 and any later updates.
Adjustment
showing old and new positions
Updated
barn positions in CAD (ftp 382 Kb)
Foundation Plans
4 July 2017 Foundation Structural Plans as a PDF file, these are the final plans from Michael Fillion. All later updates to the barn area foundation are from Victor Popp.Autocad design for the Final Foundation plans (ftp 2.1Mb)
Requested Offset staking
Code Compilance
Code compliance was performed by Harold Cutler. The code that applies is the Eighth edition of the Mass. building code which consists of the 2009 IBC with Mass amendments. The result of that compliance analysis was included verbatum as text in the overall architectural plans. These plans were submitted as part of the initial arena design and have been included with each sucessive set of architectural plans. On 1 February 2018 Mr. Cutler when asked if we could use his name and credentials said by email: "That�s fine. I have been an integral part of the development of the plans for the project and concur with the accessory use designation given the restriction to occupancy of the apartment by a barn manager." In actual fact the characterization of the apartment as an accessory use was first used in a draft of the code analysis by Mr. Cutler.
Fire Alarm
Although the Wildstar code consultant did not believe the building inspector's claim the building inspector claimed that Massachusetts code amendments required sprinklers throughout the facility. He then encouraged Wildstar to obtain a variance to allow what the code consultant thought was actually required: Sprinklers in the living spaces.
Wildstar obtained this variance to allow sprinklers only in the apartment section. Part of the variance said that the Fire Offical had to approve the Fire Alarm systems. The original plan was to expand the existing house and barn alarms to include the new facility. The fire official did not accept the original design (which was presented at the variance hearing) expanding the existing house and barn alarms to the entire new facility. The Fire Official wanted a commercial grade alarm system. Rather than delay the project Wildstar installed the much more expensive commercial system.
Sirens and strobes in a horse riding area are considered by PATH (the profesional organization Wildstar operates under and by other professional riding organizations) to be a safety hazard to riders. Any triggering of these sirens or strobes is likely to spook a horse throwing and injuring the rider. Other jurisdictions prohibit these items in a riding arena. Rather than fight this issue Wildstar has installed them as demanded by the Fire Official. Wildstar has requested of the Sherborn Fire Department that this requirement be eliminated, this has has not yet occured. (The elimination is a simple programming update to the existing system.)
A commercial grade fire alarm system is installed. This is the Fire alarm record of completion.
See the Barn Fire Panel page for zone information.
Fire Reset After Alarm
When the fire alarm system detects an alarm it is supposed to call the fire department. Apartment issues are not supposed to set off the sirens and strobes in the arena. About 10 June 2023 the alarm system correctly detected smoke in the apartment. This correctly did not trigger arena alerts, but, the fire department was not called until much later (perhaps an hour) after calls to the people! The behavior was about what we expect if the house detects smoke, but, calling for confirmation first is not supposed to be allowed for the barn system.
Clearing the alarm so it turns off the audible and strobe signalling requires a human intervention. Press and hold the Reset button in the fire panel until it says 'Output in Progress'. Then enter *259## on the panel. This should reset the alarm and turn off the signalling. NOTE: if the cause is still present the system will detect it again and trigger a new alarm.
Sprinklers
A complete discussion of sprinkers and fire alarm requirements is in the Sprinkler Appeal page.
Septic Discussion with the Board of Health
Civilized Solutions prepared a 31 January 2017 letter for the Board of Health discussing why the existing septic system could support an additional bedroom. The letter states that the system can support a 5 bedroom flow with a 50 percent overcapacity for the installation of a garbage grinder. No garbage grinder is installed or planned.
Wildstar's expectation in addition to this letter is that the site should be considered as a multi-structure campus in the same way as the Pope campus at 26 Bullard Street was considered. The bedroom count evaluation there was performed on a building by building basis rather than by adding up the room count of each building.
The existing house at 16 Nason Hill Lane contains four bedrooms.
The current assessment records have this narrative:
This parcel contains 11.3 ACRES of land mainly classified as ONE FAM with a CONTEMP Building built about 1980, having primarily WOOD Exterior and 8445 Square Feet, with 1 Unit, 4 Baths, 0 3/4 Bath, 1 HalfBath, 9 Rooms, and 4 Bdrms.
Spelling and capitalization are from the narrative.
The health agent gets a slightly different room count by counting one of the basement rooms. He also considered the kitchen and dining room a single room.
The barn and associated apartment contain one bedroom. There are two conditioned rooms in the apartment plus the tack room and office. There is one bathroom in the apartment and on half bath adjacent to the tack room. There is also an entry-way containing a sink and washer/dryer adjacent to the tack room.
The Board of Health indicated that they would approve this system with a 4 bedroom deed restriction when a full septic plan for the barn was proposed.
Drainage and Septic Layout
Joe Marquedant is following on from the work by Civilized
Solutions. He has completed drainage plans for the barn and
arena:
Drainage Page 1
Drainage Page 2
As well as a septic design:
Septic Page 1
Septic Page 2
On Monday 14 November 2017 the Board of Health approved these plans
giving the health agent authority to grant final approvals when
Fred King renews his license. The Board wants the pool septic
repair completed
before approval of the apartment. The pipe was lined from the
new pumping chamber up to the pool house. The final approval was
still pending a signoff from GLM. Unfortunately the septic engineer
that was doing the work has left GLM. (Eventually this approval was
issued on 3 October 2019 see the Pool Septic Repair section below.)
Lawn Irrigation
Lawn sprinkler systems and maps
Zone List and map PDF file
(word
document)
Septic Finish Grades
On 25 July 2019 Joe Marquedant submitted a Finish Grades Survey (DWG file) to the town of Sherborn completing the septic construction for the barn. This survey also included finish grades for the pool repair and completes that construction too.
Septic Layout
Civilized Solutions proposed two possible choices for the septic layout and connection to the existing septic system. The Gravity system is the selected strategy.
Gravity
fed septic design This passes under the chicken coop and runs
entirely by gravity.
Supplement Sheet 1
Pumped
septic design This has less disturbance but requires a pump and
associated alarm.
The septic system from the barn to the D-box of the house septic system was built, inspected by Mark Oram and approved for cover. This is the as build septic plan.
Well Pump Info
On August 15 2024 the well pump failed. It was replaced by a Grundfos SQ, SQE pump. This pump has a soft start feature that ramps up the current draw. It has a 2 year warranty. The well is 160 feet deep. The old pump was a 300 foot deep type inappropriate for this depth. Dover Pump 508 785-0463 did the installation. They were prompt but expensive, they invoices $2232 for the pump (available online for $1600), they also charged $395 to use a pump puller and $800 for labor. A 1 hp 30gpm pump was used likely a: Grundfos 30SQ10-130-230V.
Poolhouse Septic Repair
When the house was purchased a cesspool was found southeast of the outdoor pool that supported a toilet and shower in the pool house. This failed title 5. The sellers provided an approved design for repair of this system that replaced the cesspool with a pumped system. The pump basin joins the house septic system. The initial design did not have a cleanout anywhere in this line and was updated to add the cleanout. The pump basin and forced main were constructed after the purchase of the house. The septic system for the barn apartment requires that this pool house repair is completed prior to approval.
Pool
septic repair initial design This design is what was presented
to the board of health. It required modification to add cleanouts.
As
built plan for pool
septic repair.
Final Compliance for this repair was recieved on 3 October 2019.
Light Fixture Interpretation
Wildstar wanted to use inexpensive Shop light LED luninares from Costco throughout the barn and arena. These fixtures are UL dust and damp rated. The electrical inspector pushed our electrician to use vapor sealed fixtures in the barn aisles. His rationale was that dust and wet rated fixtures were needed in a barn. The fixtures used were dust and wet rated with a cord that plugged in to an outlet. They cost three times what the Costco luninares cost. The inspector then wanted the fixtures to be connected by runs of conduit. The electrician modified the fixtures removing the cord, drilling holes and attaching conduit to the holes. The inspector liked this change. Wildstar believes that the change violates the wet rating and could not be used if wet rated fixtures were actually required. Wildstar consulted a friend (the electrical inspector for a much larger town) who held that only dust rated fixtures should be required in barn aisles (wet rated fixtures are required in areas of animal confinement such as stalls). Given this opinion Wildstar did not object to the fixture modifications which due to that modification are no longer formally wet, dust or damp rated.
The inspector wanted the same sealed fixtures in the arena. His rationale was that for this area three prong plugs were required. The Costco fixtures only had two prong plugs. Wildstar already owned and had temporarily installed the Costco lights. For the arena Wildstar contacted the state Board of Fire Prevention Regulations. Phone conversations were held with Paul Vigneau in early December 2018 followed by an email on December 7th 2018 with a Request for Interpretation attached. A follow up email was sent on January 11th to Richard Fredette. On May 28th, 2019 a formal response was sent that said that the "authority having jurisdiction ... shall accept listed and labeled equipment...". Long before this letter arrived the electrical inspector allowed the Costco lights in the arena.
Site Information
Overall Site Plan for the barn and arena location. The scale is 1 inch to 20 feet. This plan shows the grades prior to construction. After construction the area beyond the end of the arena was leveled to make a round pen.
The surveyors provided these Pin Locations to reference where the foundation goes. This detail is important because the retaining wall does not have easy corners to pin. The locations were taken from the 17 September 2017 design.
Geotechnical Report from Harry
Berlis of McPhail Associates, LLC
Frost
Wall Drainage Ideas to supplement Berlis Report
Early GLM layout of the barn
site.
REVISED
Setbacks SKETCH - 16 NASON HILL LANE.pdf Shows 30 foot rear
setback in the area of the planned barn and riding ring. This sketch
was used in a dialog with the building inspector. It represents what
the building inspector agreed by email should be used for the lot
line setbacks and the strategy depicted is what is used in all barn planning.
Existing Conditions (a
PDF file)
15822_EMAIL1.dwg
(via
FTP)
CAD data for existing conditions
As built septic plan
Original design septic plan
(part 1)
Original design
septic plan (part 1) (a different scan of the above plan)
Original design septic plan
(part 2)
Original design
septic plan (part 2) (a different scan of the above plan)
Setback Requirements
These setback requirements (revised version) were proposed by GLM and confirmed by email with building inspector Henry Fontaine who said: 'As I review I agree with what you have with the exception of the front set-back, it is 60 feet.'. The original sketch incorrectly showed 40 foot distance at the front of the lot while calling out a front setback.
Use of Native Lumber
To be able to use the trees cut from the land Wildstar has become a certified mill. This allows Wildstar to certify native lumber for structural use. This email chain with Mass. DPS shows the trials and tribulations of that process.
Sprinkler Reference Info
Reference Designs
Structural design from the 401 Sandy Valley Road projectIron Horse (Calhoun) Structures
Actual Stamped
Plans For the 70' x 216' Wildstar riding arena structure.
Example 80 foot wide truss structure
Example 70 foot wide truss structure
Riding Arena
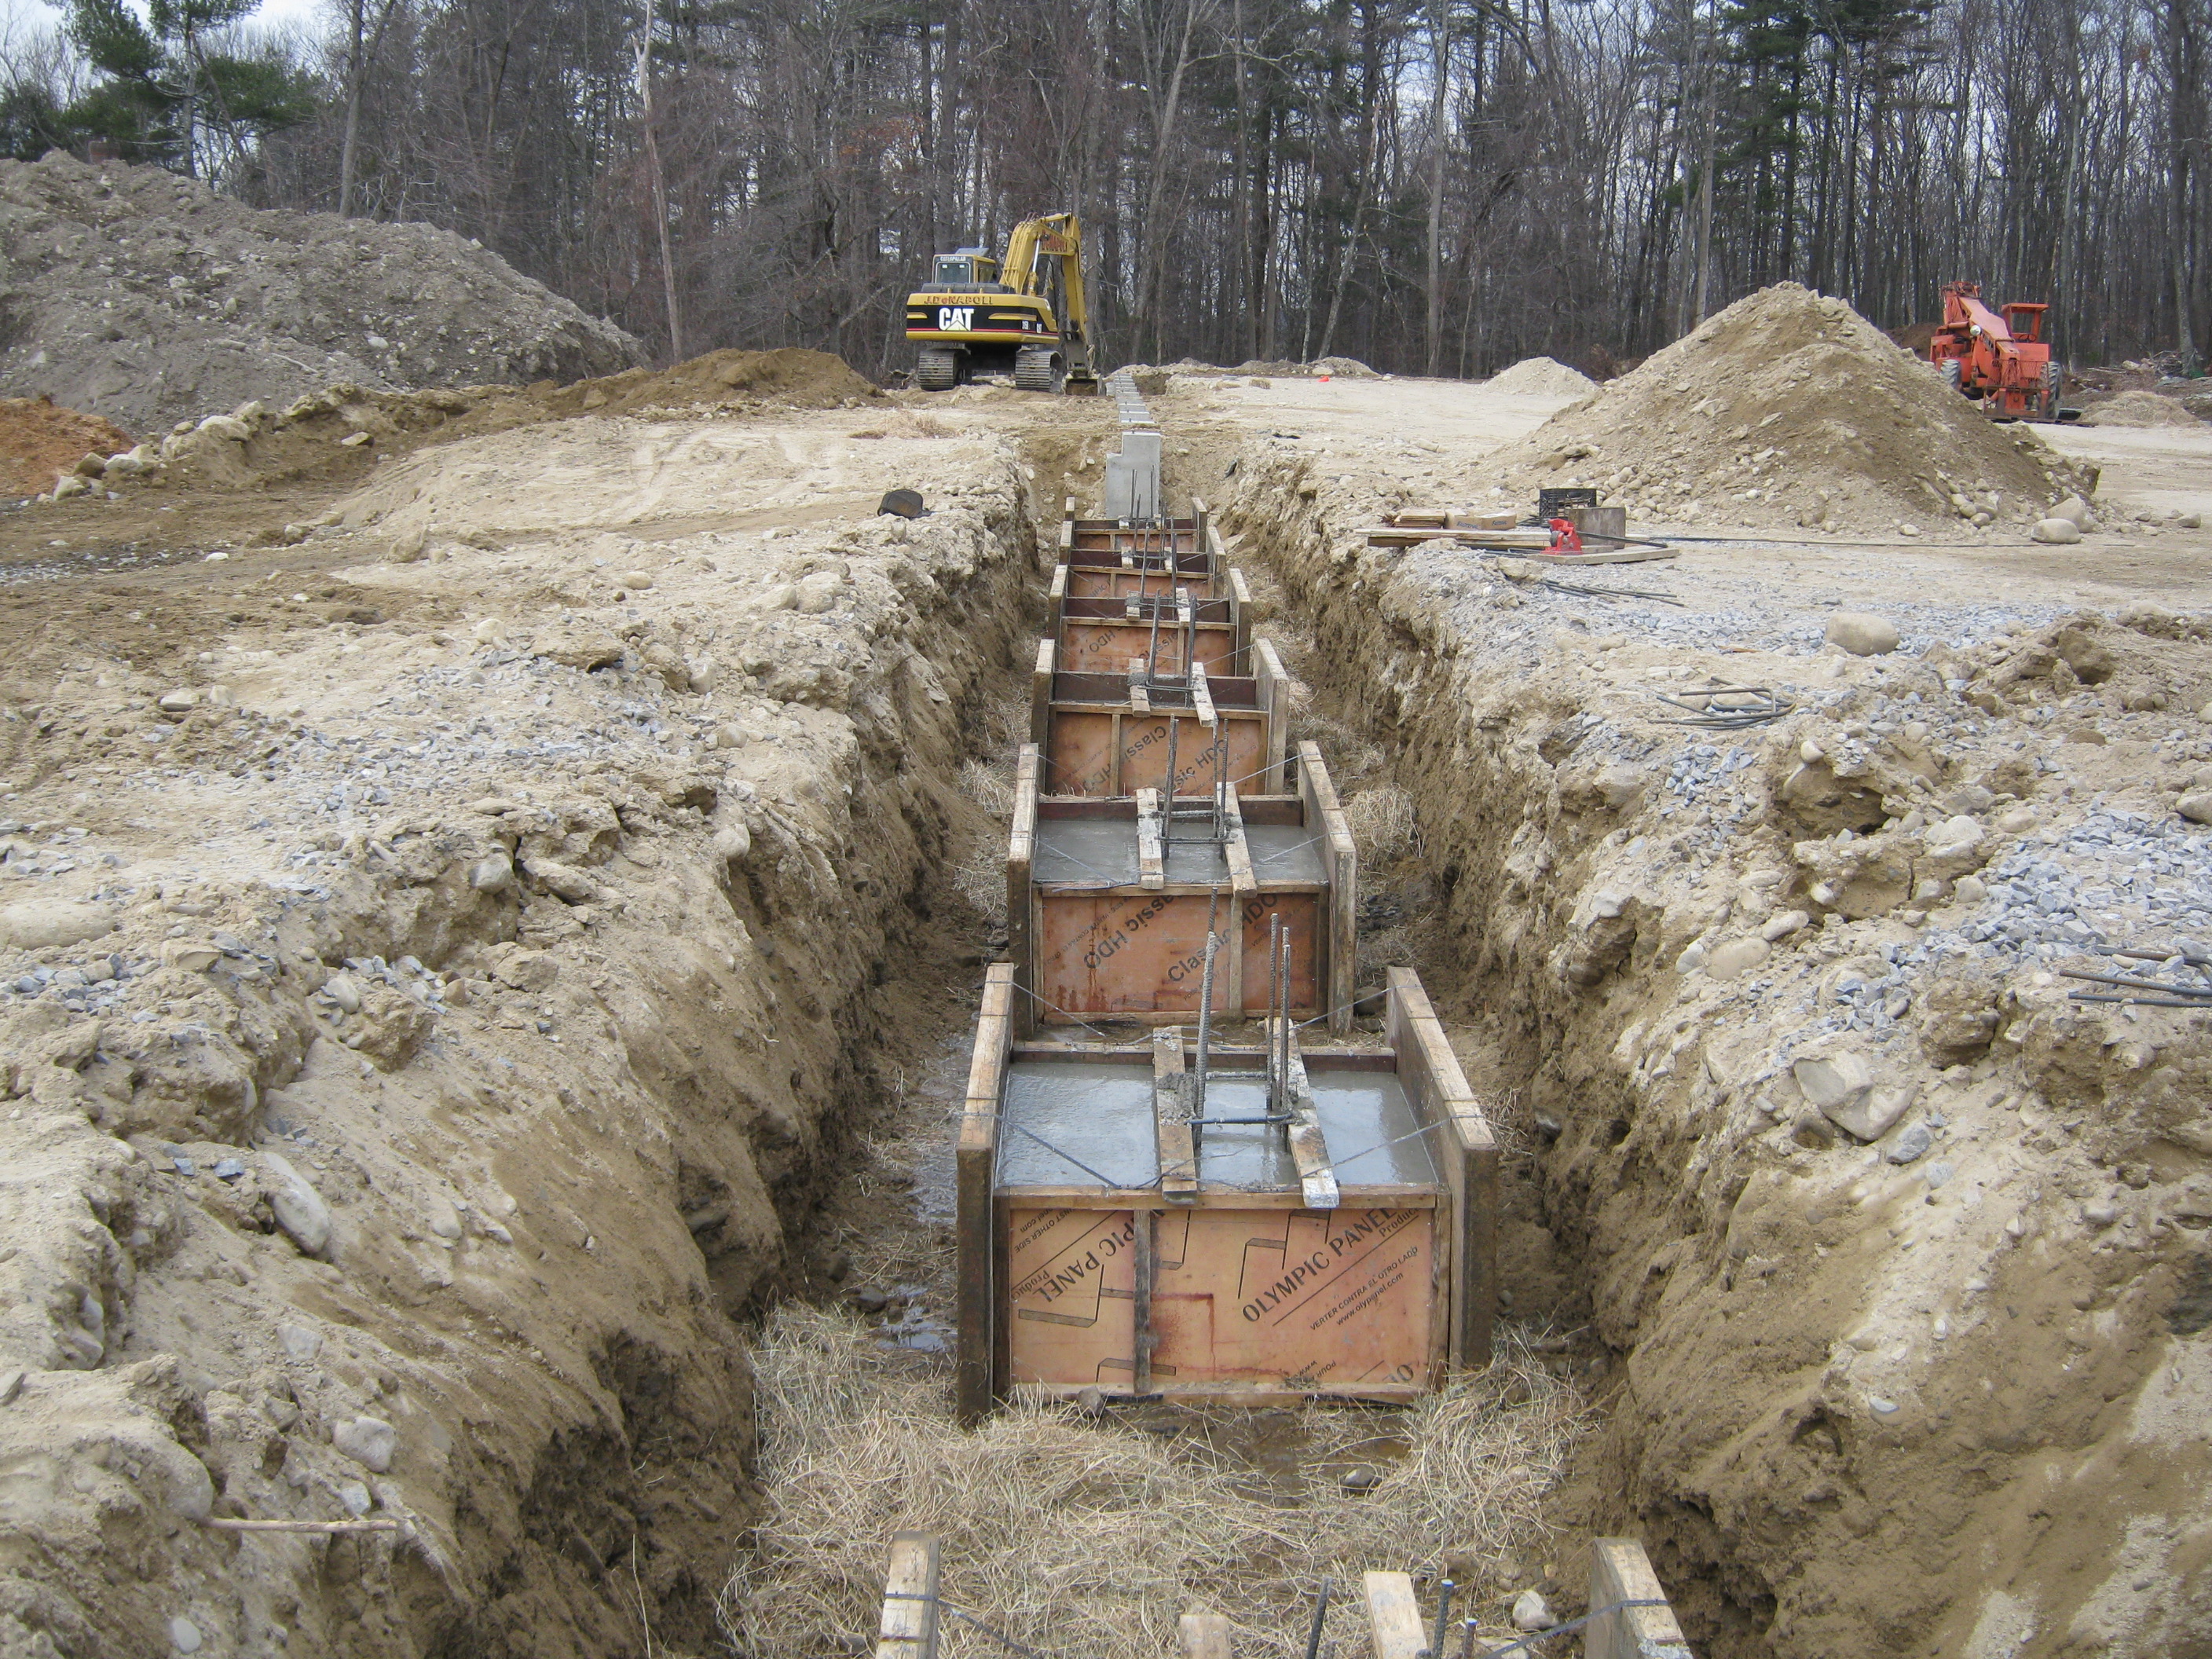
Footings Details.pdf Design information for a prototype
arena footing.
Riding Arena
Footing.JPG A photo of an example row of arena footings
(Wildstar used a full foundation).
Riding Arena Pier.jpg Close
up photo of one example arena pier.
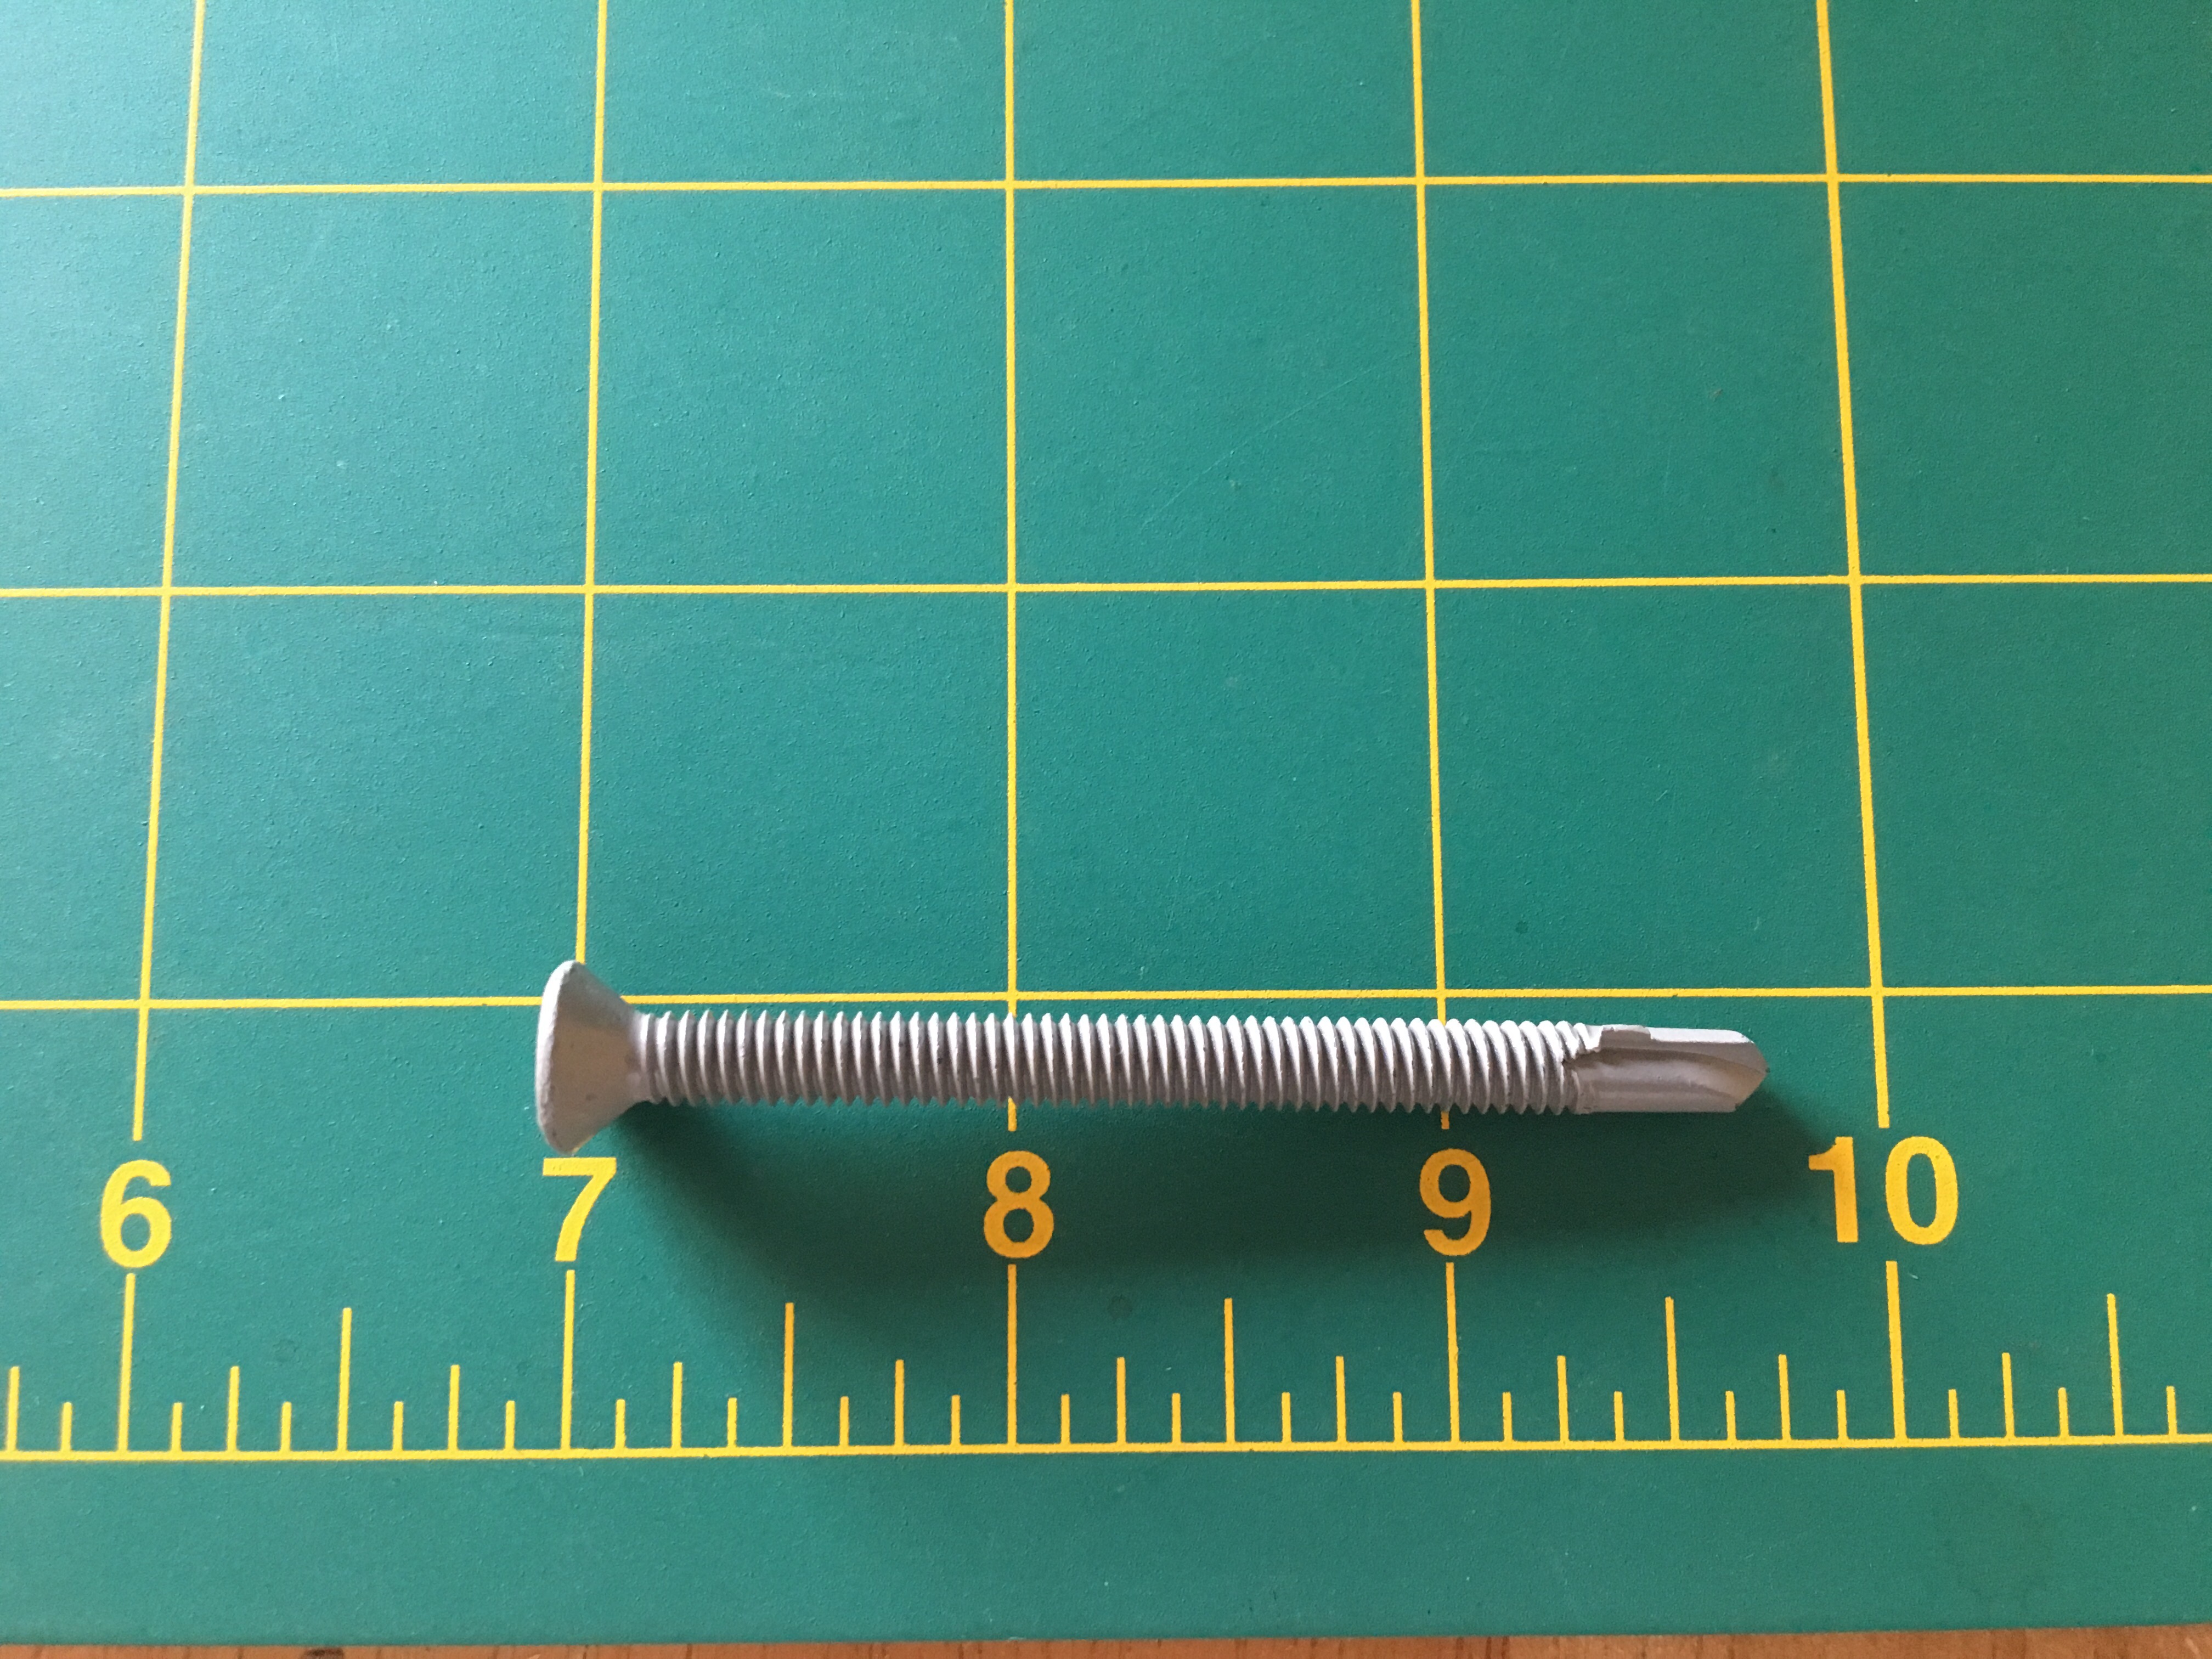
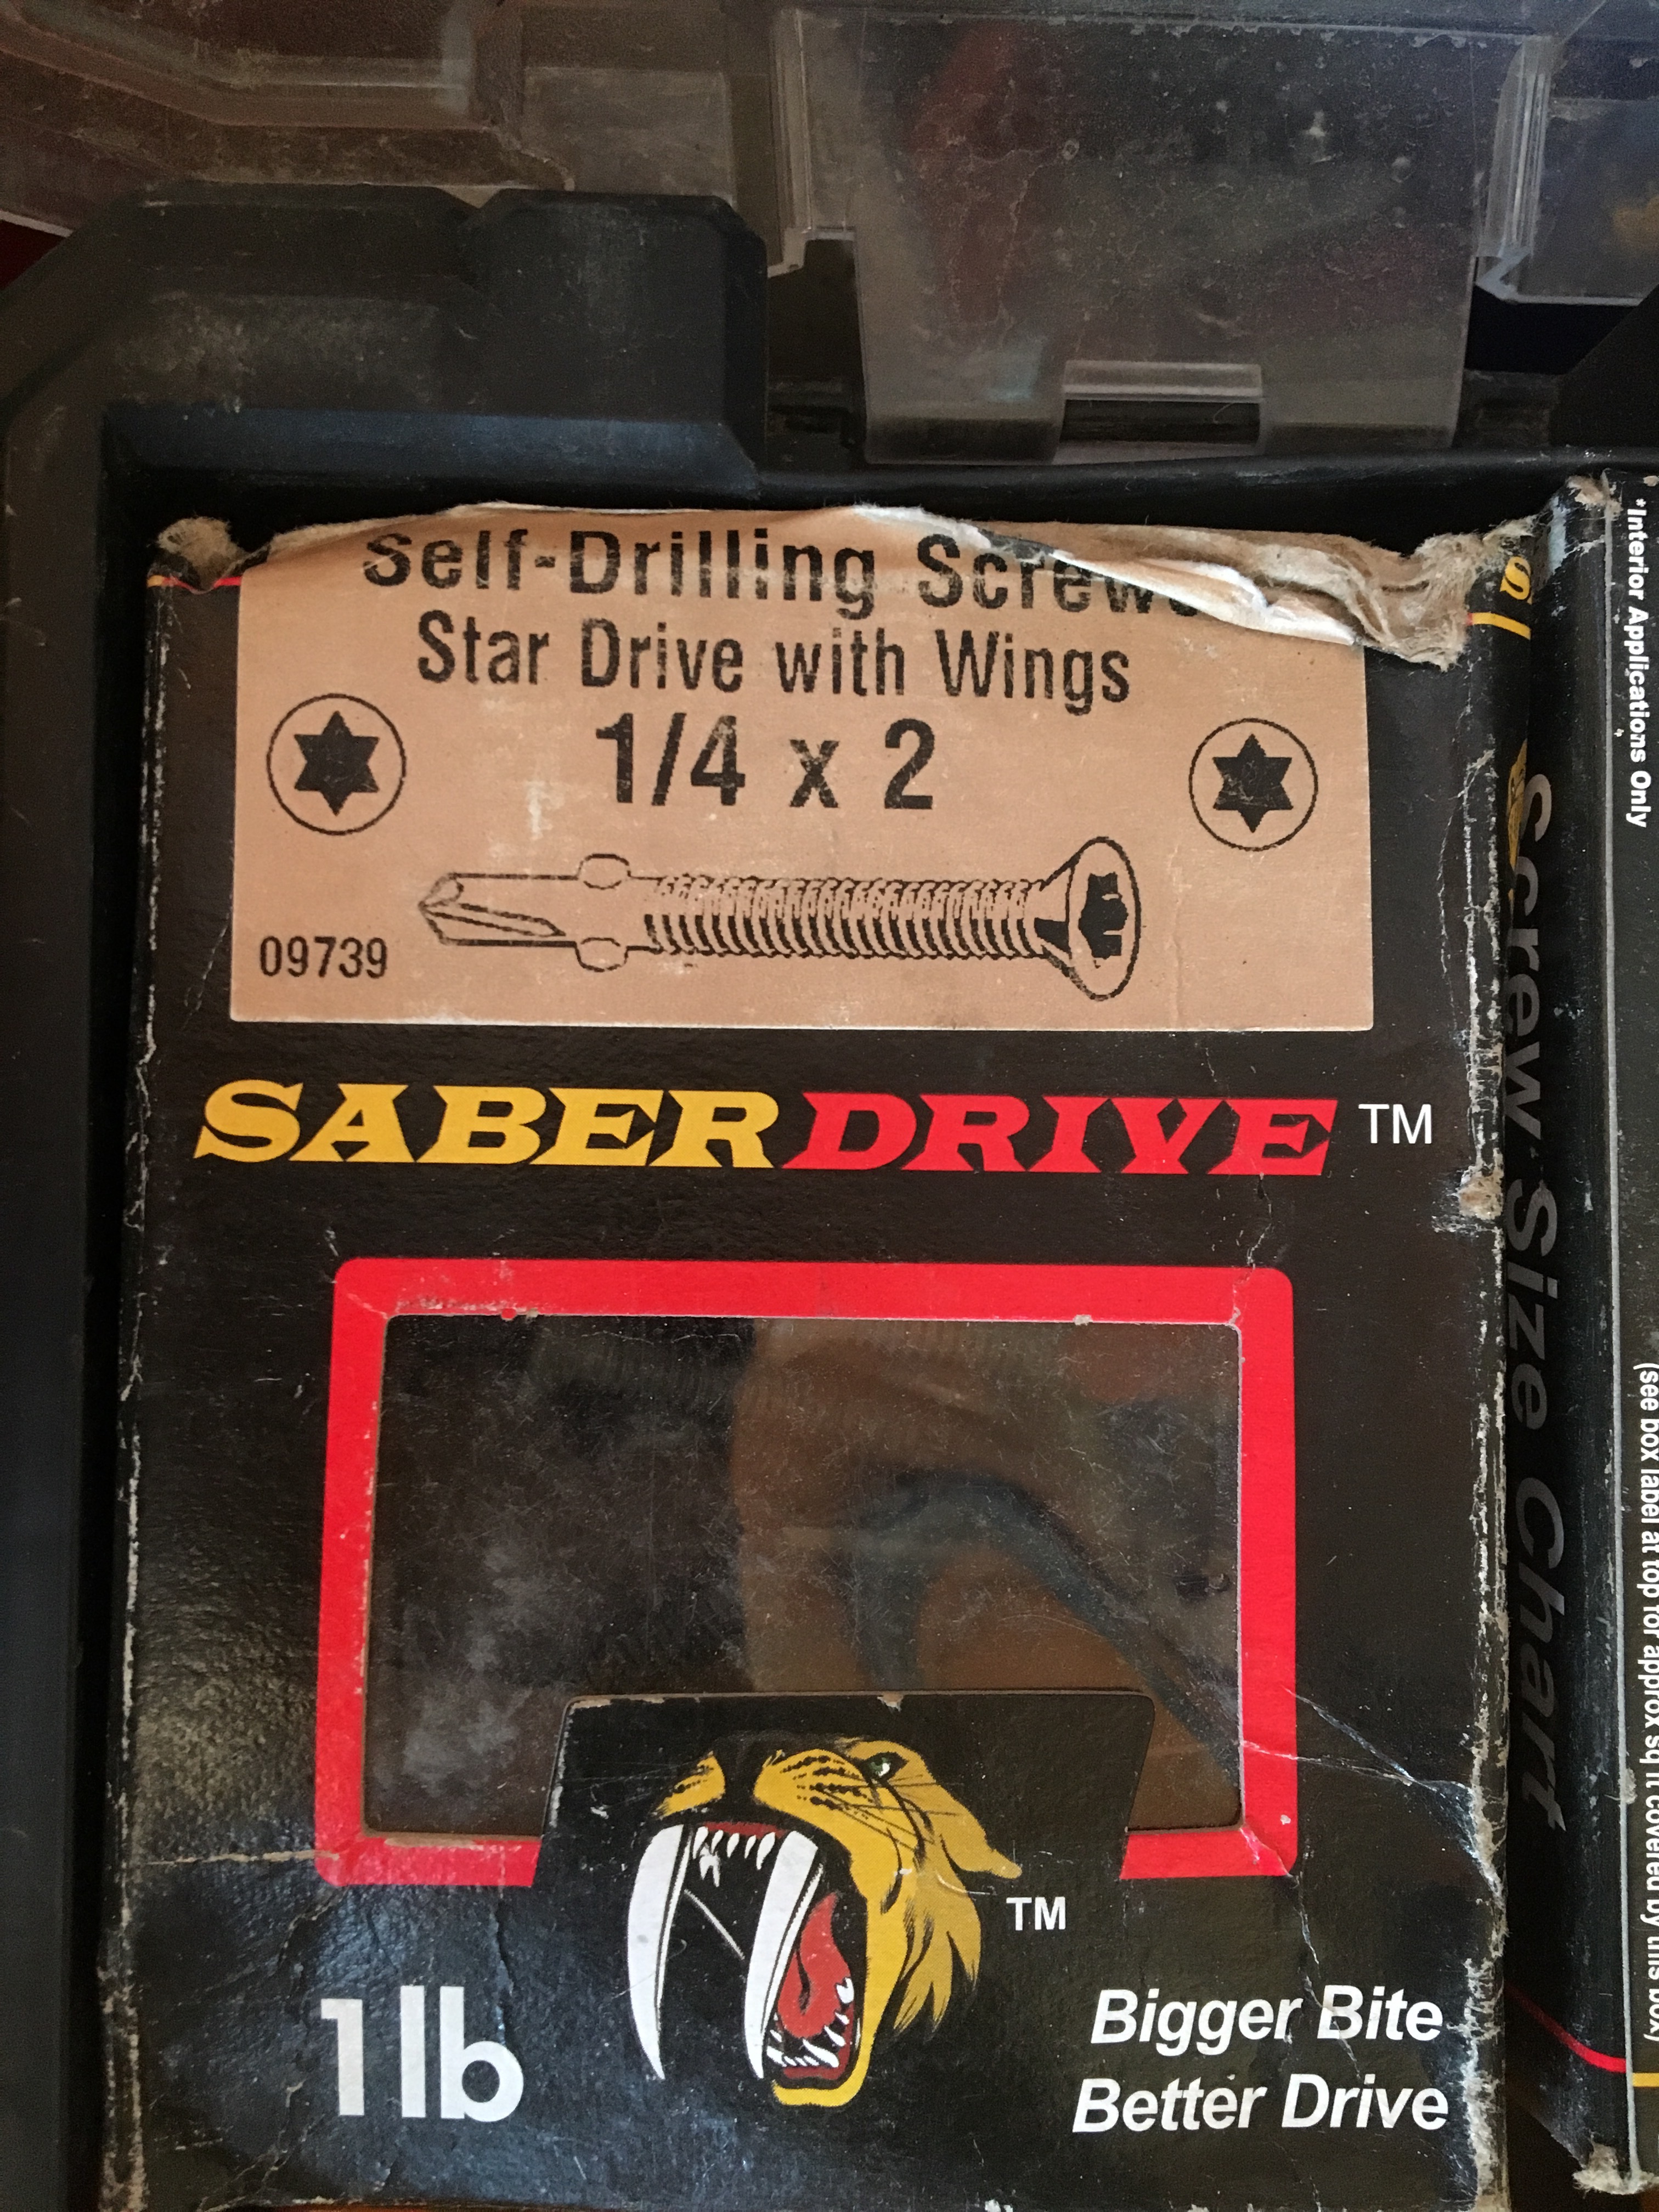
Self Drilling screw
for attaching wood to Truss
Box for screw
ZBA Apartment Layout 25 October 2017
These plans were used for the Sherborn Zoning Board of Appeals special permit hearing.
Apartment
Layout
Apartment
and tack room section
Section
through Bedroom
Section
through bathroom and bedroom
Apartment area analysis
Post Construction Inspections
Fire Alarm
Inspection 13 November 2020 performed by Shufro
Security.
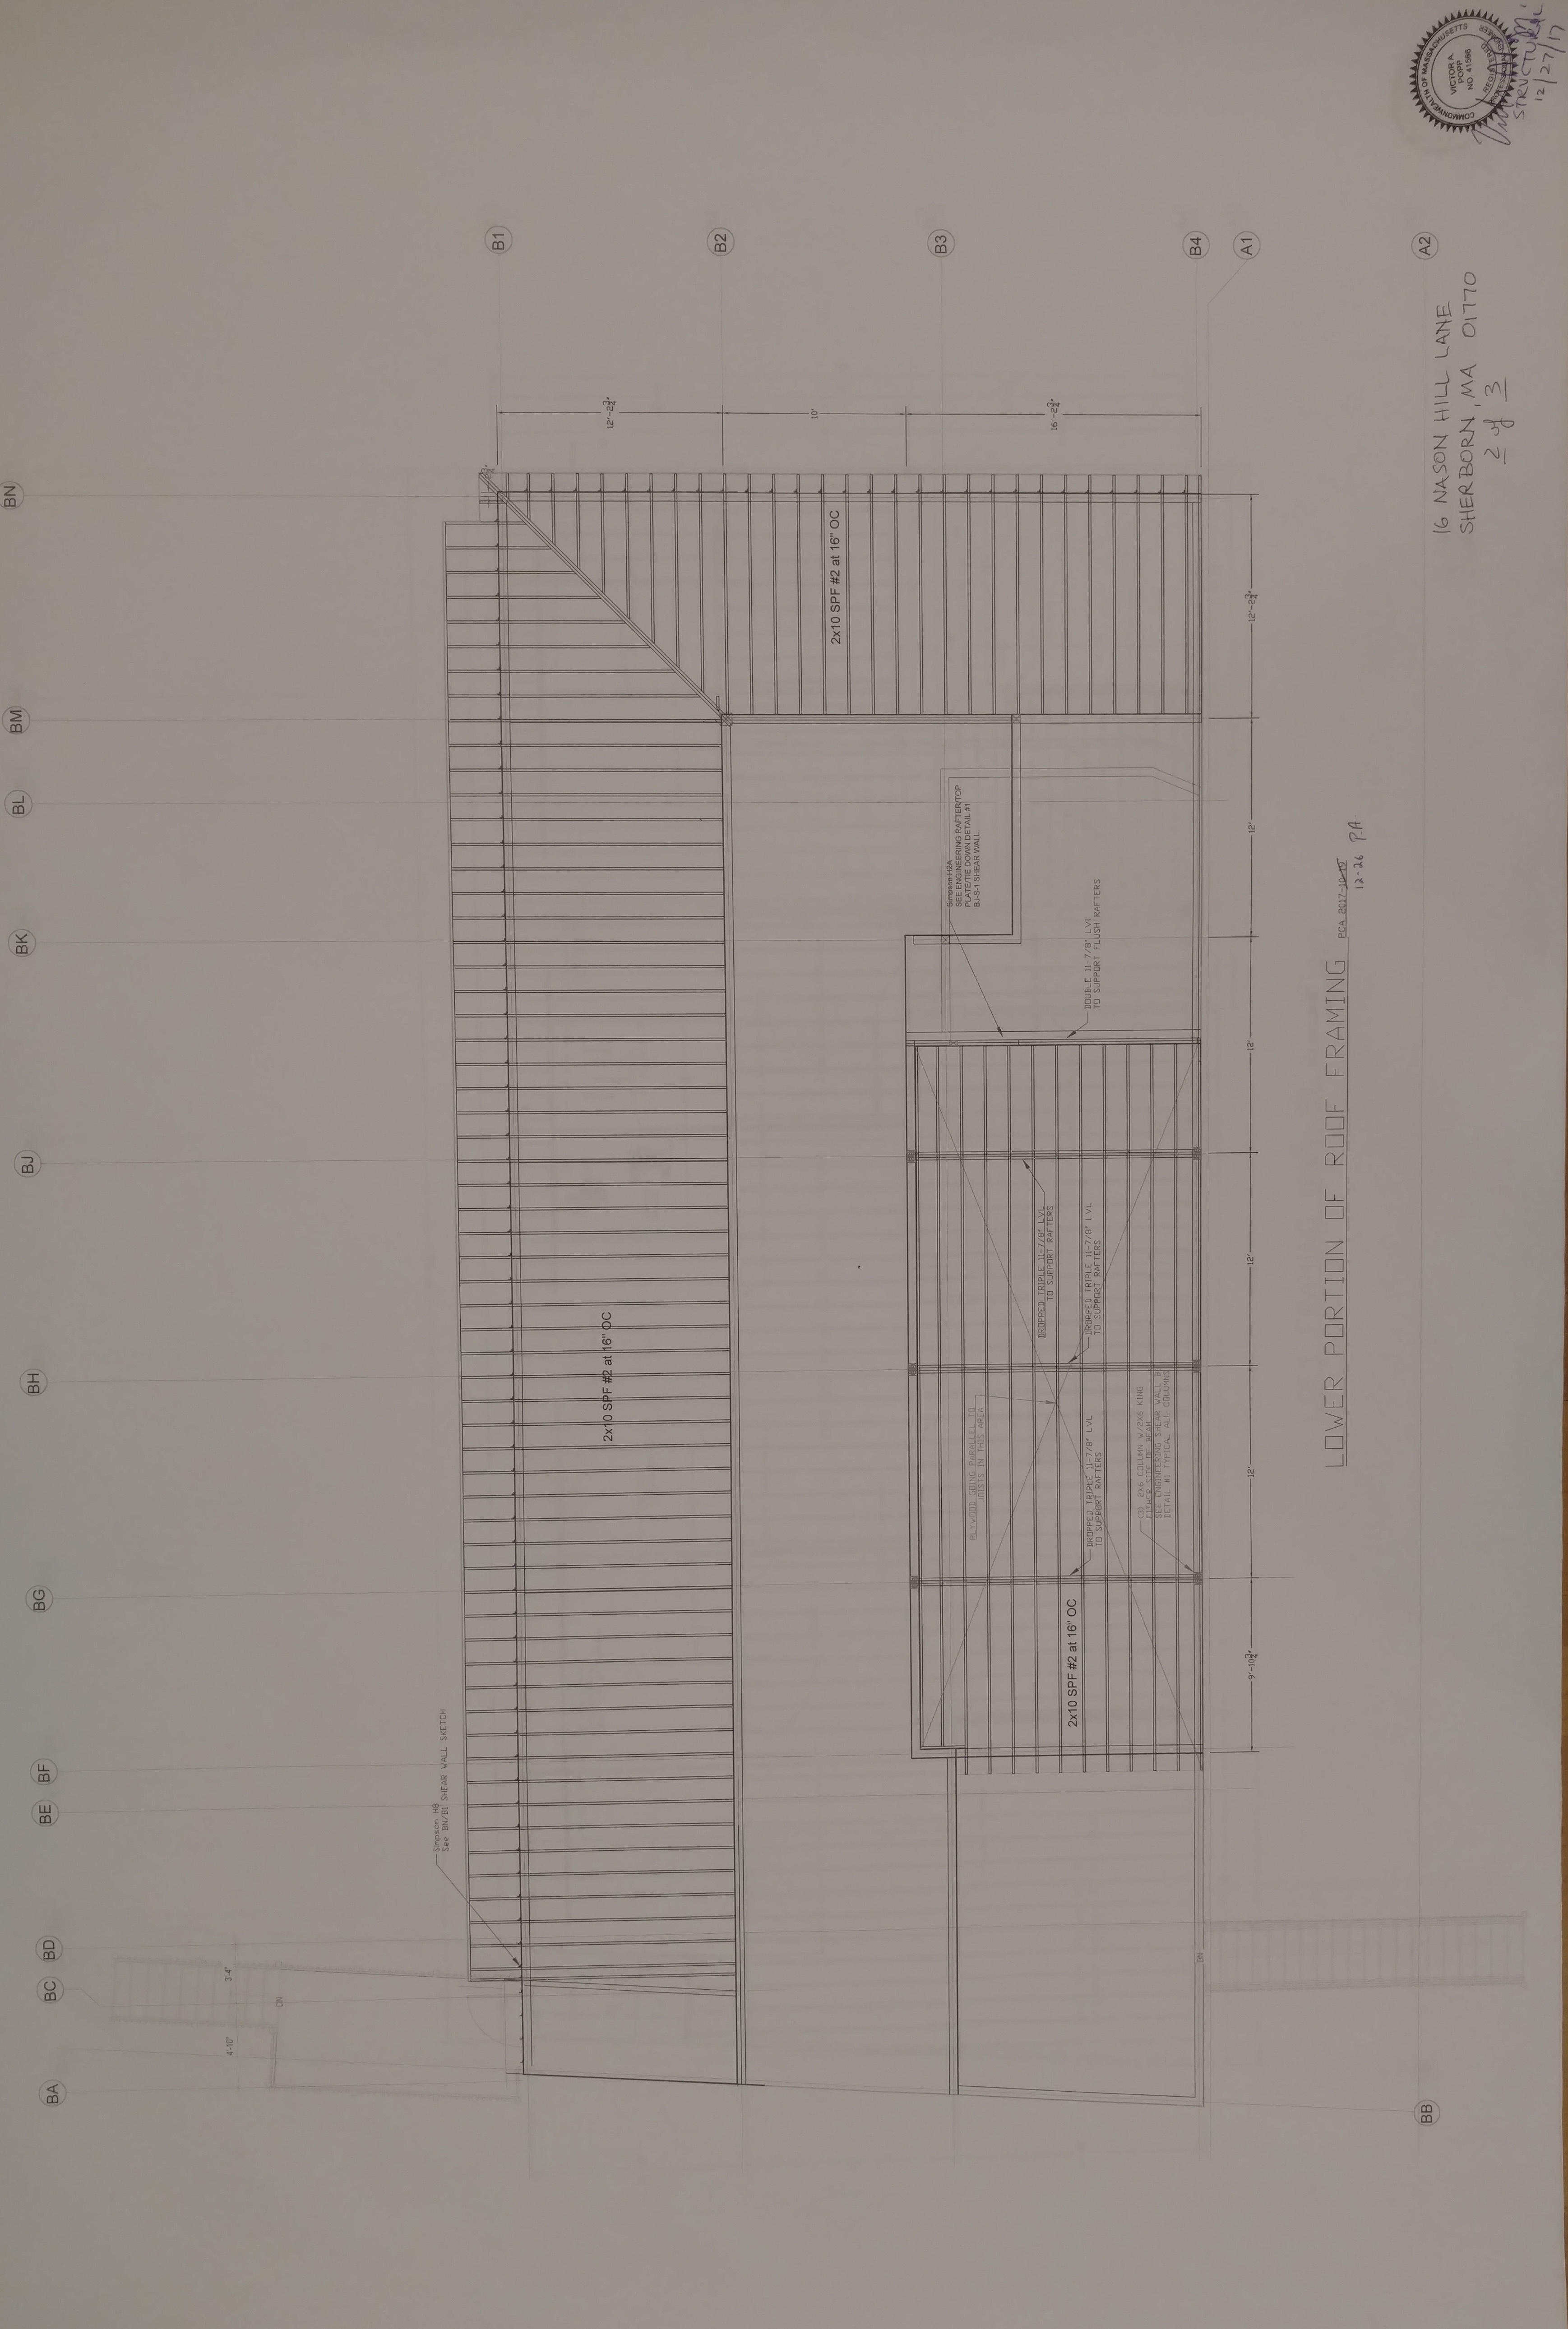
Barn plans 17 September 2017
These plans are correlated with the final Mike Fillion foundation plans.
3D Views
Code Summary sheet 1
Overall Plans
Barn Level 1 Enlarged
Barn Level 2 Enlarged
Roof Plan
(enlarged)
Building
Elevations (overall)
Building
Elevations (enlarged sheet 1)
Building
Elevations (enlarged sheet 2)
Building
Sections (sheet 1)
Building
Sections (sheet 2)
Architectural
Supplement to the Foundation Drawings (page 1)
Architectural
Supplement to the Foundation Drawings (page 2)
Architectural
Supplement to the Foundation Drawings (page 3)
Arena
Ramp and Egress Stair
Stair
and Ramp Details
Site
Layout
Rebar
shop Drawing Rev 1 Sheet 1>
Rebar
shop Drawing Rev 1 Sheet 2>
OUTDATED Architectural Supplement to Foundation plans 4 Aug 2017
These supplements show the placement of the slab in the barn area and the placement of the footings that support the ramp in the arena. They also contain waterproofing and under slab insulation details.
Architectural Supplement Sheet 1Architectural Supplement Sheet 2
OUTDATED Barn plans 13 July 2017
These plans are correlated with the final Mike Fillion foundation plans.
3D ViewsCode Summary sheet 1
Code Summary sheet 2
Overall Plans
Barn Level 1 Enlarged
Barn Level 2 Enlarged
Roof Plan (enlarged)
Building Elevations (overall)
Building Elevations (enlarged sheet 1)
Building Elevations (enlarged sheet 2)
Building Sections (sheet 1)
Building Sections (sheet 2)
Architectural Supplement to the Foundation Drawings (page 1)
Architectural Supplement to the Foundation Drawings (page 2)
Site Layout
OUTDATED Updates to Barn plans 10 July 2017
These plans update the site layout for the 4 July 2017 foundation plans update.
Site LayoutCAD data for site layout via FTP 456Kb
OUTDATED Architectural Supplement to Foundation plans 4 July 2017
(via ftp 1.0 Mb) Additional data from the architectural plans add information to these plans (i.e. the exact locations of the ramp footings). These plans call out where they have to be coordinated with the architectural plans. This set should be superceeded by the 4 August version above. Check this set to make sure all details are properly superceeded.OUTDATED Barn plans 19 June 2017
3D ViewsCode Summary 1
Code Summary 2
Overall Plans
Barn Level 1 (enlarged)
Barn Level 2 (enlarged)
Roof Plan (enlarged)
Overall Building Elevations
Building Elevations 1 (enlarged)
Building Elevations 2 (enlarged)
Building Sections 1
Building Sections 2
Site Layout
Foundation 3D view 1
Foundation 3D view 2
Foundation 3D view 3
OUTDATED Barn plans 27 April 2017 (update)
17001-A0-0-0.pdf 3D Views17001-A1-0-0.pdf Three levels of Grid Layout
17001-A1-0-1.pdf Arena Floor plan
17001-A1-0-2.pdf Barn Floor Plan
17001-A1-0-3.pdf Apartment Level Floor Plan
17001-A2-0-0.pdf East, West and North view Elevations
17001-A2-0-1.pdf South view elevations
17001-A2-0-2.pdf Arena view elevations
17001-A3-0-0.pdf Building sections
17001-PH-1.pdf Site layout
OUTDATED Barn plans 4 April 2017 (update)
A1-0-2.pdf Tiling
pattern for floor mats in main aisle.
OUTDATED Barn plans 20 March 2017
17001
- Sheet - A0-0-0 - 3D VIEWS.pdf
17001
- Sheet - A0-0-1 - CODE SUMMARY.pdf
17001
- Sheet - A0-0-2 - CODE SUMMARY.pdf
17001
- Sheet - A1-0-0 - OVERALL PLANS.pdf
17001
- Sheet - A1-0-1 - INDOOR RIDING ARENA LEVEL.pdf
17001
- Sheet - A1-0-2 - BARN LEVEL 1 - ENLARGED PLAN.pdf
17001
- Sheet - A1-0-3 - BARN LEVEL 2 - ENLARGED PLAN.pdf
17001
- Sheet - A1-0-4 - ROOF PLAN - ENLARGED.pdf
17001
- Sheet - A2-0-0 - OVERALL BUILDING ELEVATIONS.pdf
17001
- Sheet - A2-0-1 - BUILDING ELEVATIONS - ENLARGED.pdf
17001
- Sheet - A2-0-2 - BUILDING ELEVATIONS - ENLARGED.pdf
17001
- Sheet - A3-0-0 - BUILDING SECTIONS.pdf
17001
- Sheet - A7-0-1 - ENLARGED RAMP AND STAIR PLAN.pdf
17001
- Sheet - PH-1 - PROPOSED SITE LAYOUT.pdf
OUTDATED Barn plans 19 March 2017
17001.00-CENTRAL
- Sheet - A0-0-0 - 3D VIEWS.pdf
17001.00-CENTRAL
- Sheet - A0-0-1 - CODE SUMMARY.pdf
17001.00-CENTRAL
- Sheet - A0-0-2 - CODE SUMMARY.pdf
17001.00-CENTRAL
- Sheet - A1-0-0 - OVERALL PLANS.pdf
17001.00-CENTRAL
- Sheet - A1-0-1 - INDOOR RIDING ARENA LEVEL.pdf
17001.00-CENTRAL
- Sheet - A1-0-2 - BARN LEVEL 1 - ENLARGED PLAN.pdf
17001.00-CENTRAL
- Sheet - A1-0-3 - BARN LEVEL 2 - ENLARGED PLAN.pdf
17001.00-CENTRAL
- Sheet - A1-0-4 - ROOF PLAN - ENLARGED.pdf
17001.00-CENTRAL
- Sheet - A2-0-0 - OVERALL BUILDING ELEVATIONS.pdf
17001.00-CENTRAL
- Sheet - A2-0-1 - BUILDING ELEVATIONS - ENLARGED.pdf
17001.00-CENTRAL
- Sheet - A2-0-2 - BUILDING ELEVATIONS - ENLARGED.pdf
17001.00-CENTRAL
- Sheet - A3-0-0 - BUILDING SECTIONS.pdf
17001.00-CENTRAL
- Sheet - A7-0-1 - ENLARGED RAMP AND STAIR PLAN.pdf
17001.00-CENTRAL
- Sheet - PH-1 - PROPOSED SITE LAYOUT.pdf
OUTDATED Barn Renderings(older)
Looking East AX1.pdf
Looking South Axon2.pdf
Looking West Axon3.pdf
Looking North Axon1.pdf
Site overview PL-1.pdf
Barn Floorplan PL-3.pdf
Second Floor Floor Outline PL-4.pdf
OUTDATED Plan Details (older)
Top view outline
17001-A100 OVERALL PLANS.pdf
Arena outline with
ramp 17001-A101 INDOOR
RIDING ARENA LEVEL.pdf
17001-A102 BARN LEVEL 1 PLAN.pdf
17001-A103 BARN LEVEL 2 PLAN.pdf
17001-A1043 ROOF PLAN.pdf
17001-A200 OVERALL
ELEVATIONS.pdf
17001-A201 BUILDING
ELEVATIONS.pdf
17001-A202 BUILDING
ELEVATIONS.pdf
17001-A300 BUILDING
SECTIONS.pdf
17001-PL-3
FIRST FLOOR BARN PLAN - PROGRESS.pdf
17001-PL1-SITE LAYOUT
- 01-30-17.pdf
17001-PL3-FIRST
FLOOR BARN - 01-30-17.pdf
17001-PL3-FIRST
FLOOR BARN - 01-30-17_annotated.pdf
17001-PL4-SECOND
FLOOR BARN - 01-30-17.pdf
Arena sections PL-2-ARENA-01-25-17.pdf
A360
3D Model
OUTDATED Foundation Permit Plans
These foundation permit plans created by Michael Fillion are now out of date. See more current foundation plans above on this page.
Updated Foundation Permit Plans for ReviewFoundation Permit Plans
Foundation Permit Plans (printed as a PDF file might be more friendly to systems that are missing fonts)
Images and text Copyright © 2000-2025 by The Dragonnorth Group All rights reserved.
Contact: mnewman@dragonnorth.com